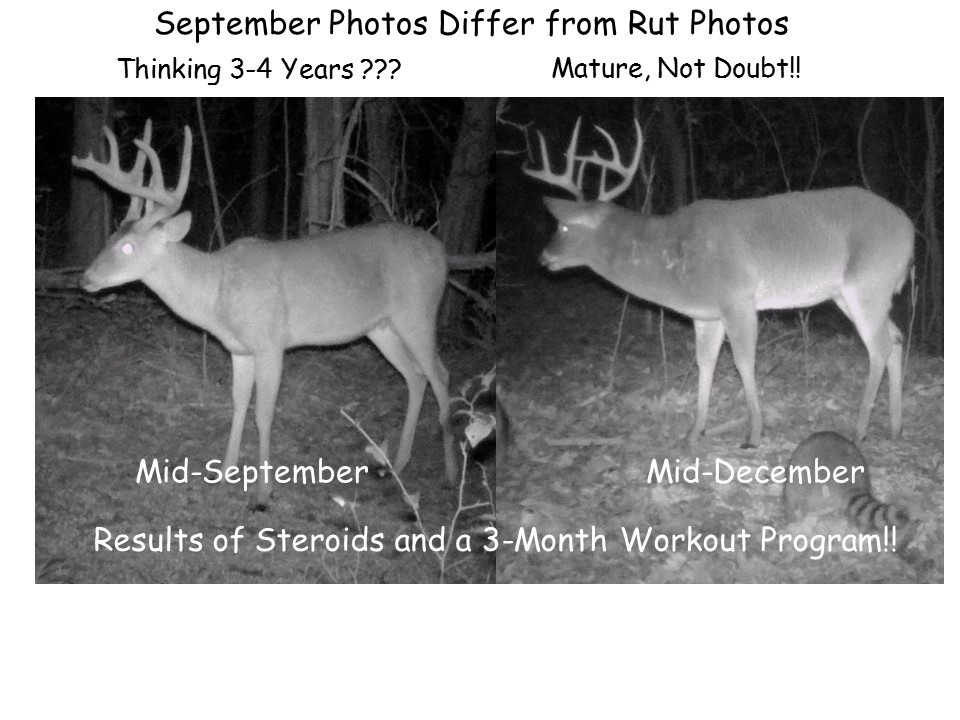
Estimating age of photographed bucks can be difficult enough due to less-than-ideal body alignment in the photos. Combining that with seasonal changes in body shape will really increase difficulty. Bucks change dramatically between the early fall compared to when they are primed for the rut, so always consider the date relative to you area’s peak rut. Bucks relax during the summer, putting extra nutrients into body fat and rapidly growing antlers. His interests and activities change once testosterone levels increase dramatically in August, leading to antler hardening and shedding of their velvet during mid-to-late September.
This buck photographed in mid-September has a relatively thin neck, which makes you think he’s 3-4 years old. His antlers look huge, but remember velvet antlers always appear to be larger than fully hardened antlers. Note how much different he looks in December – his neck is much thicker, a result of steroids (testosterone) and 3 month of serious exercise (rubbing, scraping, traveling, and fighting). But, also note his thinner hind quarter in December, which is the result of his reduced feeding activity during his increased exercise (sounds just like most human weight-loss programs!).
https://www.buckscore.com/wp-content/uploads/2019/01/aging-deer-mississippi_feature.jpg720960BuckScorehttps://www.buckscore.com/wp-content/uploads/2024/09/buckscore-logo.pngBuckScore2019-01-24 20:58:232019-08-28 12:20:10Why You Should Consider Seasonal Body Changes When Aging Bucks
Aging Deer on the Hoof, Jawbone Aging, and Cementum Annuli
By: Eric Michel
If you’ve been around deer hunting for any amount of time you probably understand that many hunters get caught up in trying to age deer, and for good reason. Aging deer, whether dead or alive, can give you valuable information about what you can do to better manage your herd and reach your goals. Many hunters would like to consistently harvest bucks of a certain antler size, but often times fall short. Allowing those bucks to live for a year or two more would likely help those hunters accomplish their goals, but they won’t know that if they aren’t aging their deer.
There are several ways to age deer, but it’s important to understand that none of them are 100% accurate and accuracy usually decreases as deer get older. Each method also has a certain level of subjectivity associated with it. The only way to know for certain how old a deer is, is to give it some type of unique identifier at birth. Outside of that, you can rarely say with 100% accuracy that a deer is a certain age, but you can say that a deer is displaying characteristics associated with a certain age. Even though people will use the number of antler points and antler configuration to keep track of a deer throughout the years, they are still making assumptions about how old the deer is the first time they see it. Even if you think the deer is most likely a yearling when you first see it, there’s only about a 30% chance that buck will be on your property the next year. This is because about 70% of yearlings will disperse up to five miles away from where they are born. Additionally, the number of points and a bucks antler configuration can change from year-to-year depending on disease, quality of nutrition, and antler injuries. This article discusses the three most common methods to age deer.
Cementum Annuli
Most people have probably heard about how you can use growth rings to age a tree. Well the same concept can be applied to white-tailed deer. A calcified layer of cementum is laid down each year a deer is alive which allows you to take a cross-section of the tooth and count the number of rings associated with it. This method is done by removing one of the front incisors from a dead deer and sending it off to a lab so the age can be estimated. Generally speaking, the lab will charge you a minimum cost (usually around 75$) so it’s best to wait to send in all of the incisors you’ve collected until after the hunting season.
Counting cementum annuli is considered to be the most accurate method of estimating age, though it’s not perfect and there is little, if any, research that has compared ages derived from counting cementum annuli to those of known-aged deer. This method can also be cost prohibitive for individuals who harvest a large number of deer from their property or even state agencies who collect samples from sometimes hundreds of deer.
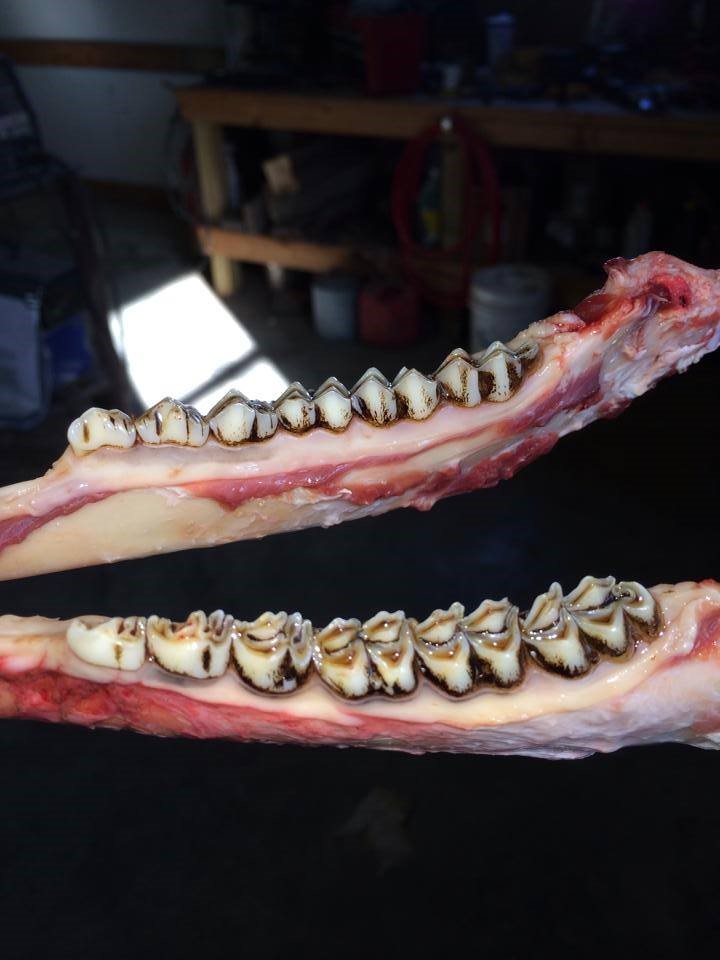
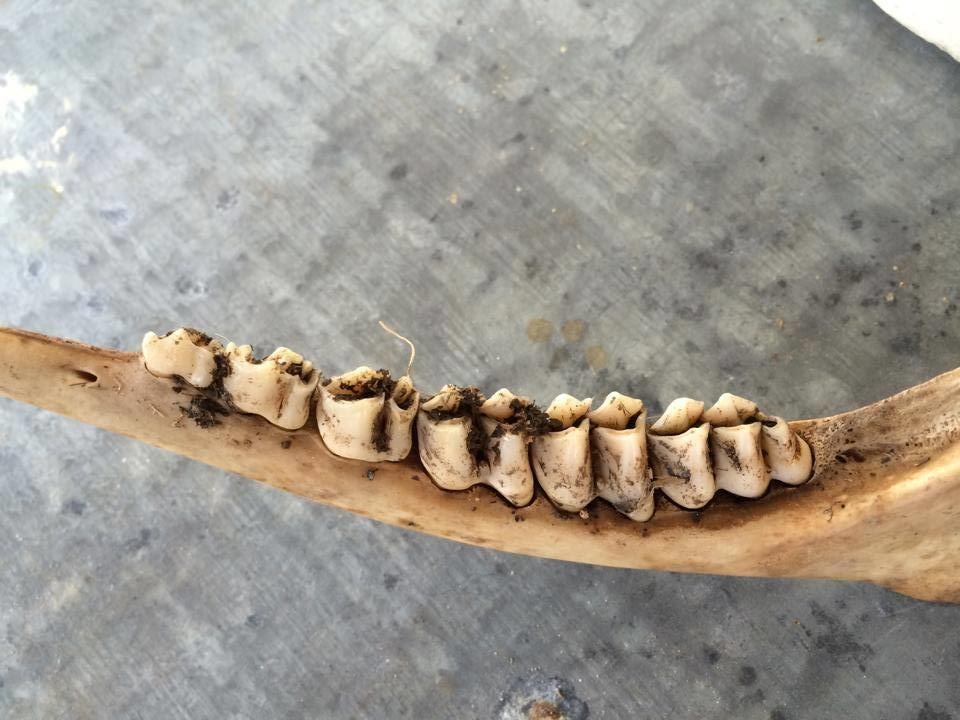
Tooth Replacement and Wear
Tooth replacement and wear is the oldest method used to age deer. This method is great for several reasons. First, it’s cheap. You can do this method by yourself without having to send the jawbone off for analysis. It is also fast after you know what you’re looking for. The biggest downfall of this method is its inaccuracy and subjectivity. There are several factors that can impact the wear rates for a deer’s tooth (individual variation associated with the deer, diet, sand content in the soil, etc.). This can cause an individual deer or even a population of deer to have different wear patterns compared to other individuals or populations. Additionally, when assessing the wear, the difference between a 2.5- and 3.5-year-old deer can be minimal and two people may have differences in opinion when looking at the same jawbone. On a positive note, this method is great for placing deer into one of three age classes: fawns, 1.5-year-olds (yearlings), or 2.5+. The downside is this may not be detailed enough to help you achieve your management goals.
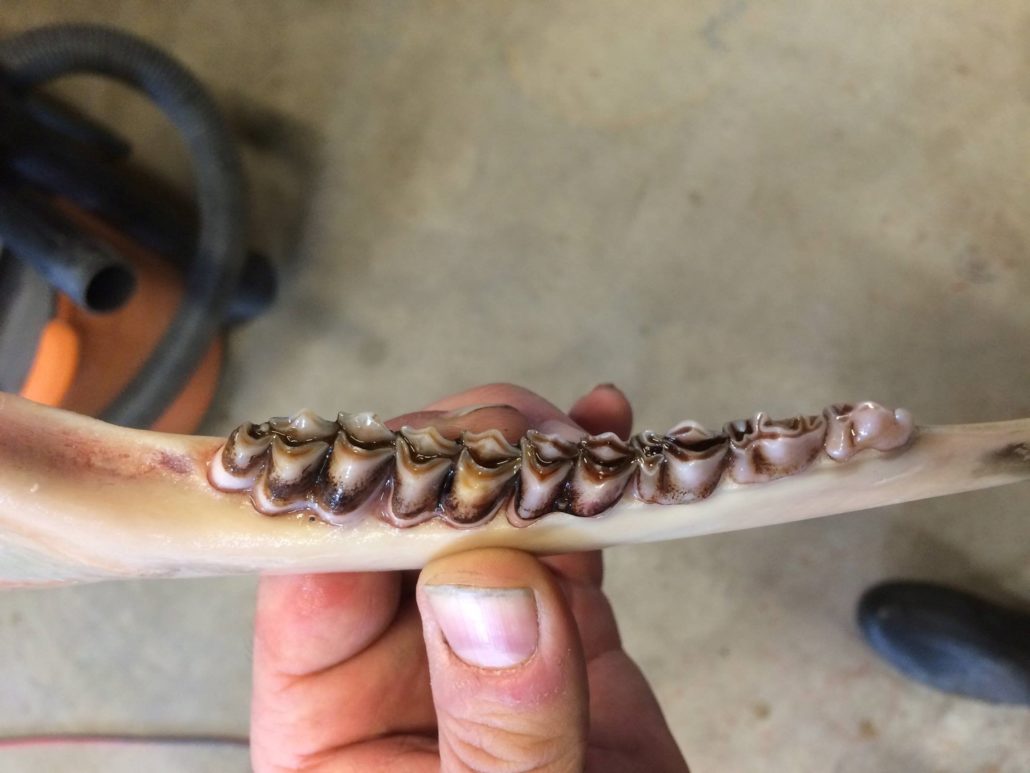
So how do you use this method to age deer? This method revolves around identifying which teeth have been replaced and then understanding the subsequent wear patterns. The replacement portion of the method is almost 100% accurate while the wear portion of the method has decreasing accuracy as a deer ages because you are comparing the ratio of dentine (dark part of the tooth) to the enamel (white part of the tooth) on the lingual crest which is the crest adjacent to the deer’s tongue.
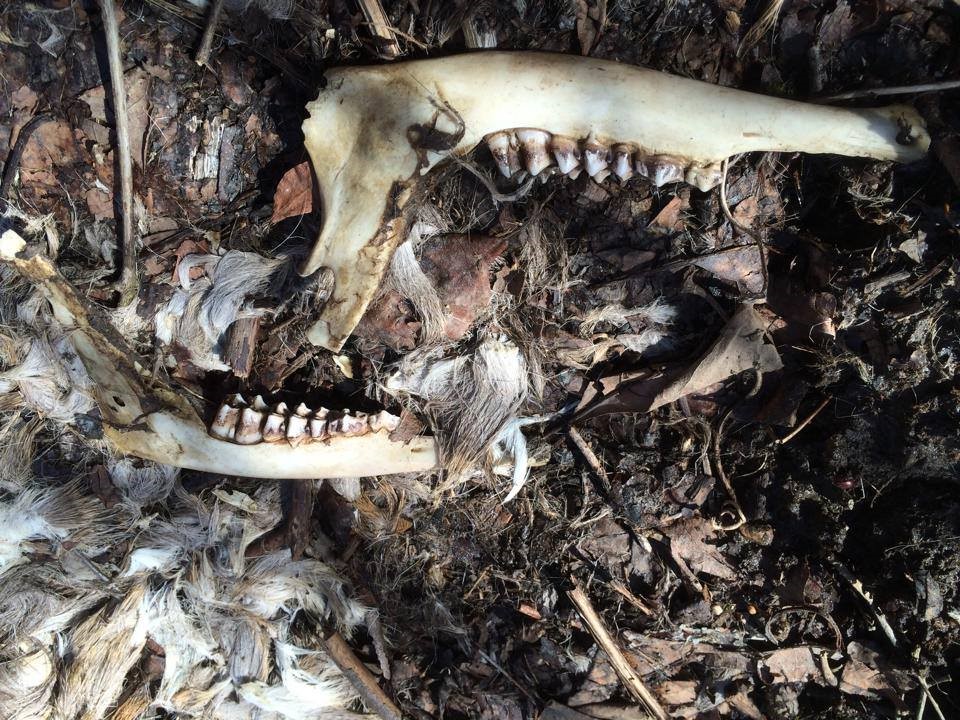
Fawns
Aging fawns is easy because they don’t have all of their teeth yet. An adult white-tailed deer will have six teeth on their lower jaw. If you harvest a deer and it has less than six fully erupted teeth and the third premolar is a tricuspid (three cusps), then it is considered to be a fawn.
Yearlings
You can age yearlings with almost 100% accuracy because you are still using tooth replacement as your guide. Remember, the first thing you do when aging a jawbone is count the number of teeth on the lower jawbone. If there are six teeth, the next thing you do is look at the number of cusps on the premolar or third tooth in from the front. If this is tooth is a tricuspid, then it is a yearling or 1.5-year-old deer. This is easy to identify, but it gets more complicated depending on the exact age of the deer. If your state allows for an elongated hunting season, deer may have already replaced their tricuspid tooth. If so, the new bicuspid that has replaced it will be much whiter than the surrounding teeth with very little wear.
2.5-year-olds
You can still use the replacement portion of this method to classify deer as at least 2.5-years-old. This is pretty easy to do. First, you make sure there are at least six teeth. Next you check the third premolar to see whether it is a tricuspid or a bicuspid. If it’s a bicuspid, and the first three teeth display some staining and wearing, then you can classify the animal as at least 2.5-years-old. However, if the third tooth is a bicuspid and the first three teeth are completely white with no wear or staining, then the deer is still likely a 1.5-year-old.
3.5+ year-olds
Aging deer as 3.5-year-olds or older means you now have to use the tooth wear portion of the method. For this, you start on the first molar (the fourth tooth in from the front) because this is the oldest tooth in the jaw. The concept of tooth wear is pretty simple. Looking at the tall portion of the crests, you simply compare the width of the dentine to the width of the enamel. If the dentine is at least twice as wide as the enamel, then the deer can be labeled as a 3.5-year-old. If the dentine is not twice as wide, then the deer is likely a 2.5-year-old. You use this same comparison of dentine to enamel to age a deer to 5.5+. So for example, if the dentine on the fourth tooth is twice as wide as the enamel, then the deer is at least 3.5-years-old so you move to the next molar. If the dentine on that tooth is not twice as wide as the enamel, then you stick with the age of 3.5, but if the dentine is twice as wide on the enamel of the fifth molar, then the deer is likely 4.5-years-old. You then apply this same concept to determine if the animal is 4.5- or 5.5-years of age. If the dentine is at least twice as wide as the enamel on the 6th molar, then the deer is at least 5.5-years-old, but if it isn’t then the deer is probably only 4.5-years-old. Accuracy dramatically declines with the increasing age of an animal and aging to 5.5-years is adequate for most management schemes so it’s best to stop and aging at 5.5-years.
Aging Deer on the Hoof
Aging deer on the hoof is one of the most used methods by both hunters and biologists. You don’t have to watch any hunting show long and you will inevitably hear somebody say something along the lines of “look at this 2.5-year old, he sure is an up and comer”. Everybody likes to think that they can accurately age on the hoof and there are several benefits to being able to accurately age a buck on the hoof. Mainly, because it is the only way you can assess the age of a buck while it’s still alive which should ultimately help you reach your management goals. Aging a buck on the hoof takes a lot of experience of looking at pictures and even with that, it is the least accurate method. A study that polled state deer biologists and university researchers showed that when given a series of pictures of bucks, only 62% of them accurately aged yearlings, only 43% accurately aged 2.5-year-olds, 25% for 3.5-year-olds, and less than 30% accurately aged 4.5-, 5.5-, 6.5-, and 7.5+ year-old bucks. But despite being an inaccurate method of aging, it is still widely used. Here are some characteristics you can use to help you decide how old that buck is before you pull the trigger.
Fawns
Aging fawns on the hoof is pretty easy but also very important. For example, if you are trying to fill your doe tag during a late season hunt, you don’t want to mistake a buck fawn for a yearling doe. It’s much easier to identify fawns when they are in a group with adults because they will generally be the smallest of the bunch. You can also look at the shape of their head. Fawns obviously have smaller heads and will tend to look like a soda bottle, short and stubby.
Yearlings
Yearling bucks should be one of the easiest deer to estimate age for, but again, only 62% of professionals were able to accurately place bucks into this age class. There are several things to look for that will help you when aging yearling deer. Primarily, you should be looking for underdeveloped muscles in the buck’s front and hindquarters. They will also have pencil thin necks and their stomachs will run at an upward slant from their front quarters to hindquarters. Another characteristic to look for is how long their legs look. Younger deer tend to have legs that look disproportionately long because they haven’t filled out yet in their quarters and stomach regions. Probably the most tell-tale sign that a buck is only 1.5-years-old is if it looks like a doe after covering up it’s antlers. If this is the case, then you most likely are dealing with a yearling buck.
2.5-year-olds
Bucks that are 2.5-years-old can be difficult to tell from 1.5-year-old bucks. Generally speaking, their legs still look long for their body, though they will have front and hind quarters that will be more filled out than a yearlings. A 2.5-year-olds neck will also begin to be more filled out than a yearlings during the rut.
3.5-year-olds
Being able to identify a buck as 3.5-years-old can be one of the most important things you can do for your management plan. This is because 3.5-year-olds have only reached about 75% of their maximum antler size. That remaining 25% can be the difference between a 130-inch buck at 3.5 and a 160-inch buck at 5.5. Unfortunately, the 3.5-year age class is one of the most difficult to accurately age.
By 3.5-years, bucks will start to have more swelling in their necks during the rut with their neck flowing more into their brisket. Their legs will start to look more proportional to their body and they will have a sleek, muscular look to them though their front and hindquarters won’t be fully developed. They will also start to develop moderate tarsal staining.
4.5-year-olds
By 4.5-years, a buck will start to develop the sleek racehorse look. They will have fully developed front and hindquarters but will look more muscular than anything. Their necks will begin to look very swollen during the rut and their stomach will be flat from front to hindquarters. They will also display an increased amount of staining on the tarsal gland.
5.5+
Once a deer has reached the age of 5.5-years they are generally considered to be fully mature. These deer will have fully developed front and hindquarters but they will no longer look as muscular as they did at 4.5. Bucks that are 5.5+ tend to have a sagging belly and a swale in their back. Their necks will flow right into their brisket and will look quite large after swelling during the rut. A fully mature bucks legs will also tend to look short relative to their body because their body is now fully developed.
Regardless of whether you are looking to age deer on the hoof to help determine which bucks you will harvest this fall, or are trying to collect harvest data to monitor your management program, age data can be invaluable. Keep these methods in mind this fall when trying to age your deer.
https://www.buckscore.com/wp-content/uploads/2018/10/agining-deer-101_feature-Copy.jpg15362048BuckScorehttps://www.buckscore.com/wp-content/uploads/2024/09/buckscore-logo.pngBuckScore2018-10-29 16:36:262019-08-28 12:20:11How to Age White-tailed Deer | Three Methods You Can Use This Deer Season
By: Weston Schrank, BuckScore® Specialist and Biologist
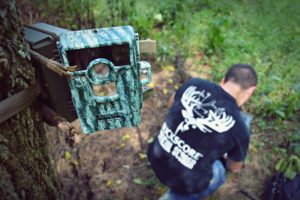
The first of a long list of responsibilities for a deer and land manager is to find out what is going on the property. It’s been a long hunting season… some deer have been killed by hunters, others killed by predators. The cornerstone of your new property management plan, and next year’s harvest plan, is taking a census of which deer and how many there are on the property. The best way to do this is by running a post season trail camera survey.
Post Season Trail Camera Survey
Most surveys are preseason surveys in summer, to determine which bucks are on the hit list… but a post season survey can be far more important to a deer manager. Population number, health assessments, post season age structure, and post season sex ratio are all very important to take note of after deer season.
Winter, specifically late February and March, is the hardest time for deer. A trail camera survey allows you to see the status, size, and overall health of the deer herd before this stressful time. Deer population numbers can fluctuate in terms of how many deer you actually see on the property. Your property may get an influx of deer stacking into your bedding areas, south slopes, and disturbed woodlots if you have a decent amount of cover and ideal habitat. This can cause a lot more stress to the property than what your management plan and property is set up for. Trail camera survey results combined with post season scouting can reveal management projects that might be needed before late February and March. This information also allows you to make smarter decisions on doe harvest, food plots, and even predator management!
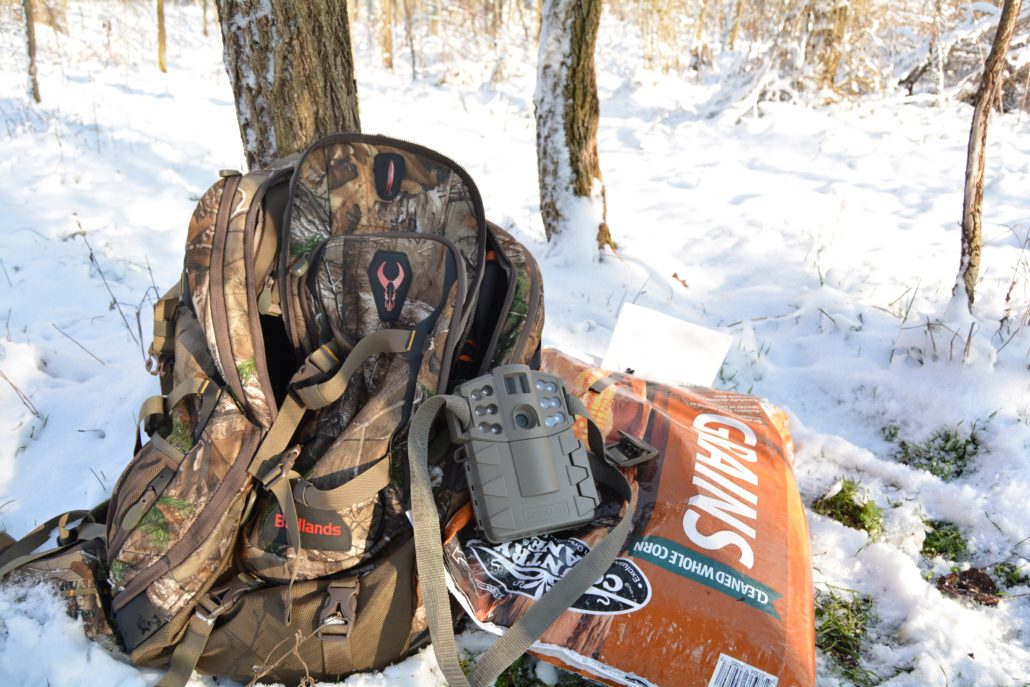
What You’ll Need
300 – 500 lbs. of corn or more per 100 acres of property (depending on deer densities)
One trail camera per 100 acres of property
New batteries for your trail camera
8 GB or larger SD card (check compatibility with camera)
Time, enough time to refill trail camera stations every 2-4 days (depending on deer densities)
Trail Camera Survey Instructions
When setting up a survey you need to stick to the correct format that was conducted in the original research in order to get accurate results. The correct setup calls for a trail camera for every 100 acres. However, each property calls for different numbers depending on how it hunts, topography, and its habitat diversity. For example, while one camera may seem to cover an entire 70-acre property, you can learn from observations that each side of the property is used by different deer, and more importantly bucks, the number a survey uses as an index to estimate doe numbers. Setting up a trail camera on each side of this 70-acre property will give the ability to observe and identify each individual deer using the property. As another example, a 150-acre property in will have the same number of cameras. The habitat on this farm isn’t as diverse, meaning the deer move more freely from one camera location to the other.
After deciding how many cameras you need, the location of the trail cameras is your next decision. Your ideal trail camera location would be an area that you can maximize deer encounters with. You will want an area that is relatively clean of brush, saplings, and tall grass, essentially anything that can set off the camera besides a deer. Set up the trail camera about chest high and facing north or south to keep the morning or afternoon sun from blinding your image. Place 50-100 lbs. of corn out about 10 yards from the camera.
After the area is cleaned up and corn is down, turn your attention to the proper trail camera settings. The most important aspect that is often messed up by hunters and landowners is the setting and duration of the survey. The correct settings are 1 photo burst with a 5-minute delay. Make sure you have fresh batteries and an empty formatted memory card and run the survey for 3 weeks or 21- 24 days. During this time, keep coming back to ensure there is always corn on the site.
Trail Camera Survey Results
Once the 3 weeks are up you will pull the cameras. By this time you might have already been finding sheds, or deer will be casting their antlers within a few short weeks. There is no reason to keep the corn and trail cameras running this late into the season.
You are now ready to start the most important part of the survey, calculating the deer population and making decisions based on the survey. While the calculations are relatively simple, making decisions based on the data can be a little more confusing.
Look out for another video coming out in the upcoming weeks on how to start calculating these trail camera survey results. We will walk you through how to identify bucks, estimate does and fawn numbers, score bucks on the hoof, and what results management decisions can be derived from. I will also be pairing these videos with off-season responsibilities and activities you can be doing now that can increase deer movement across your property for next year’s hunting season.
In the meantime, here are several blogs that you can check out to increase your knowledge of deer, deer management, and deer hunting!
https://www.buckscore.com/wp-content/uploads/2018/01/trail-camera-survey-setup_feature-1-scaled.jpg17072560BuckScorehttps://www.buckscore.com/wp-content/uploads/2024/09/buckscore-logo.pngBuckScore2018-01-09 20:36:082019-08-28 12:20:14Trail Camera Survey | Take Inventory of Your Deer Herd This Winter
Getting the perfect trail camera photo is hard enough. Add to it the pressure of trying to acquire a picture that would work to score with the BuckScore® program can feel next to impossible. This article’s aim is to clarify what pictures can be scored and what pictures cannot.
BuckScore® software scores deer based on the information you manually put in. The scoring starts with a reference feature. This measures the scale, angle, and other photo characteristics based on your manual measurement of the ear width, eye, or eye-to-eye measurement. After the reference feature, you will draw the other measurements on the antlers. This is why clear, crisp angles at correct angles must be used when using the BuckScore app.
Images That Cannot Be Scored Using BuckScore®
There are several images that won’t work when using the BuckScore® program, however they revolve around 4 main attributes.
Low quality
Movement
Angles
Anatomically incorrect reference features (mounted deer)
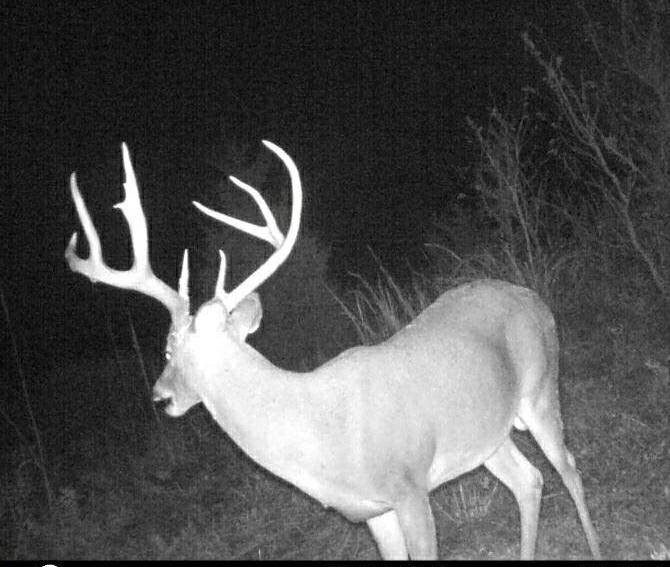
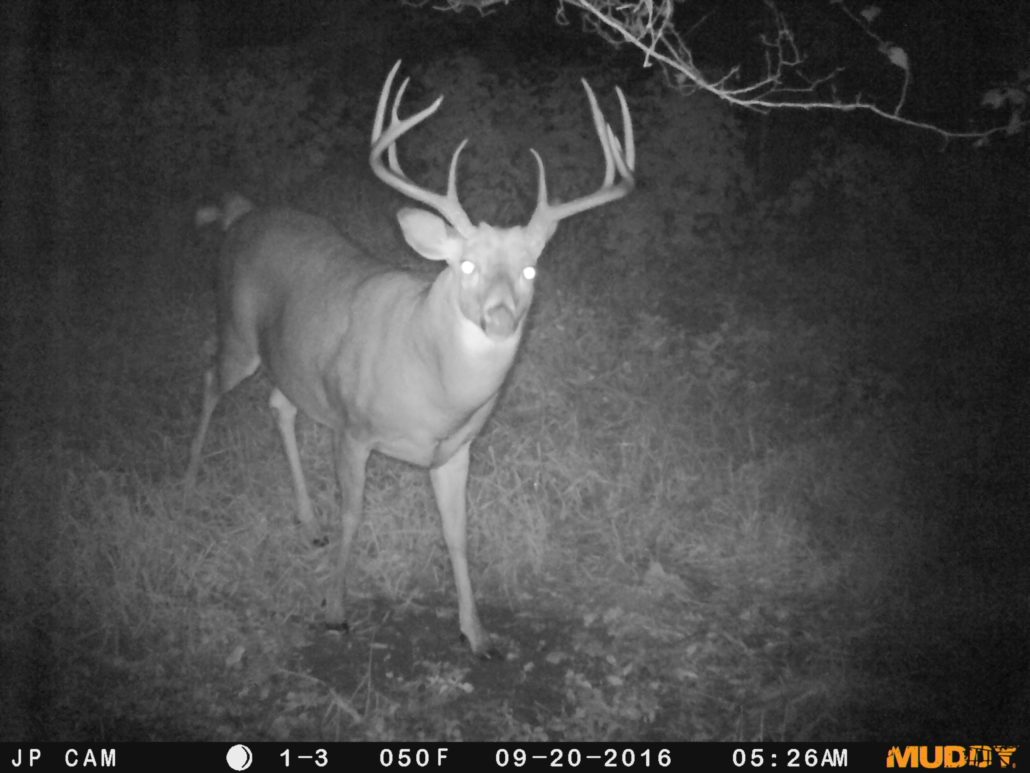
Low Quality
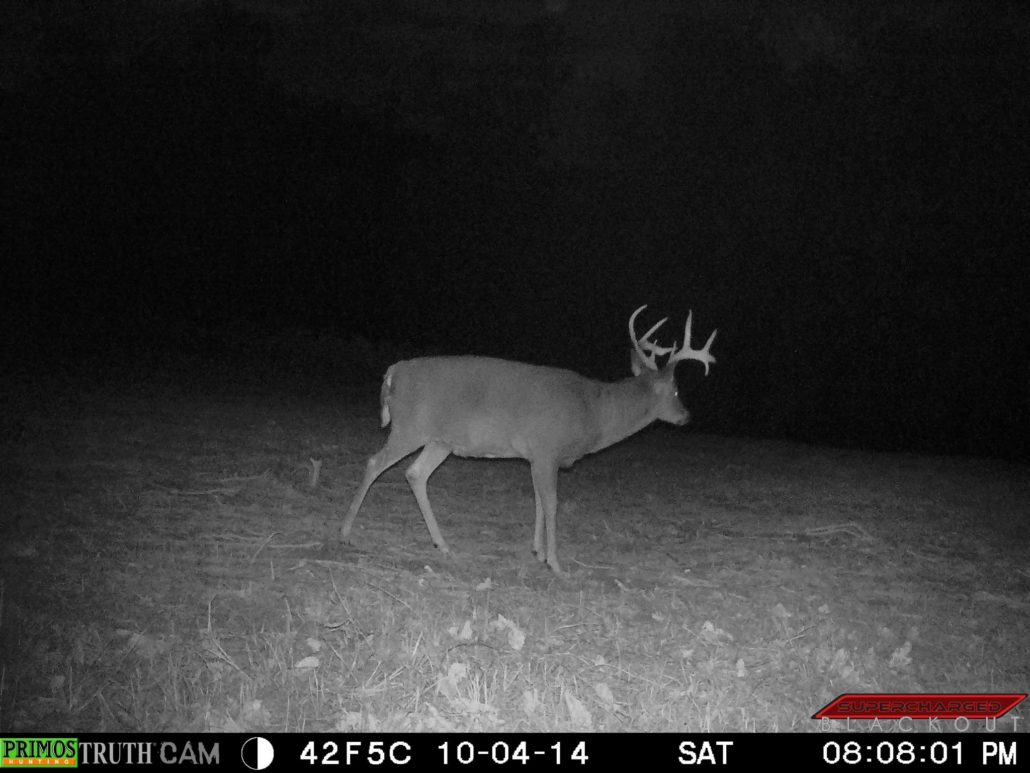
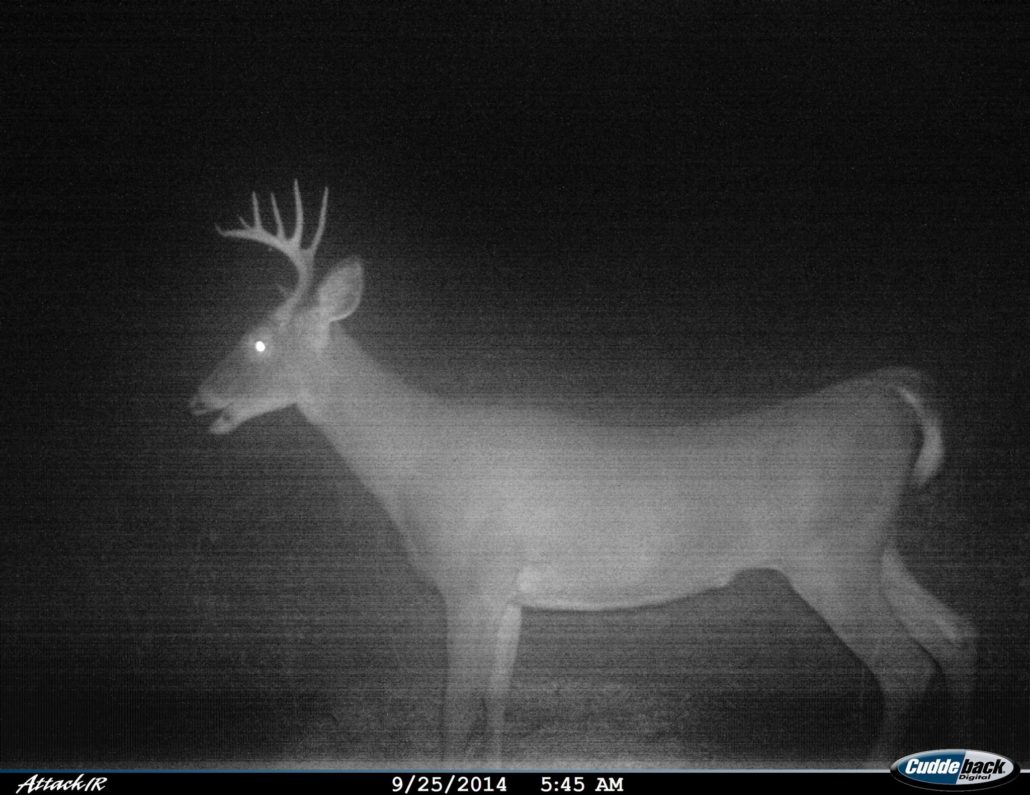
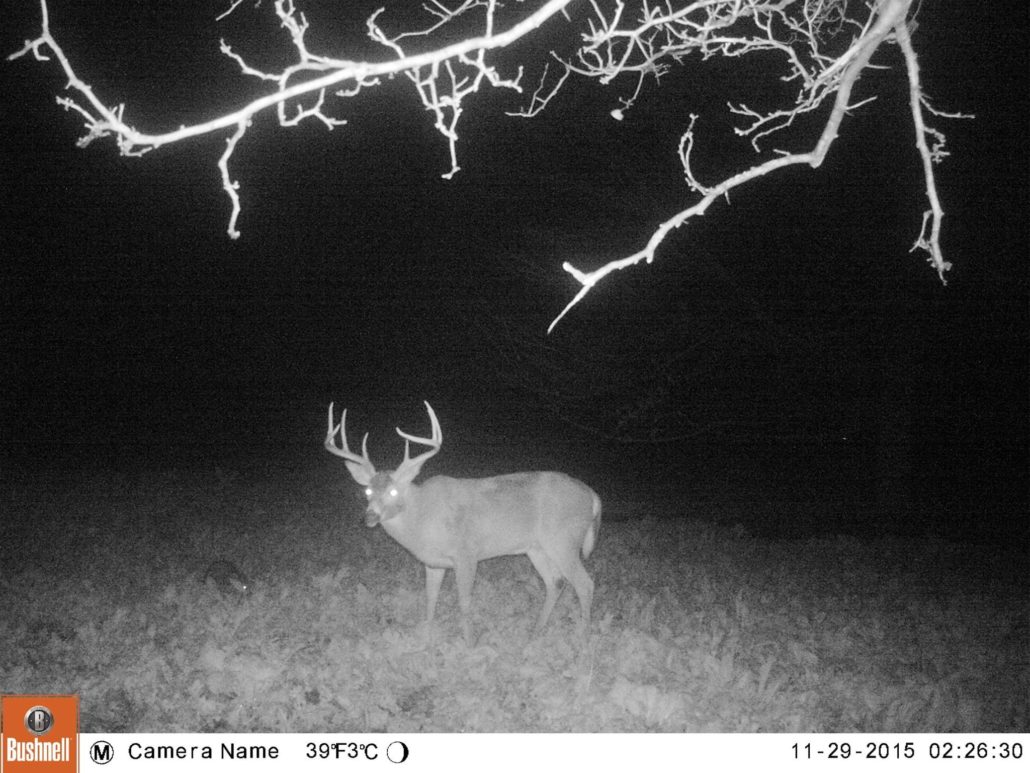
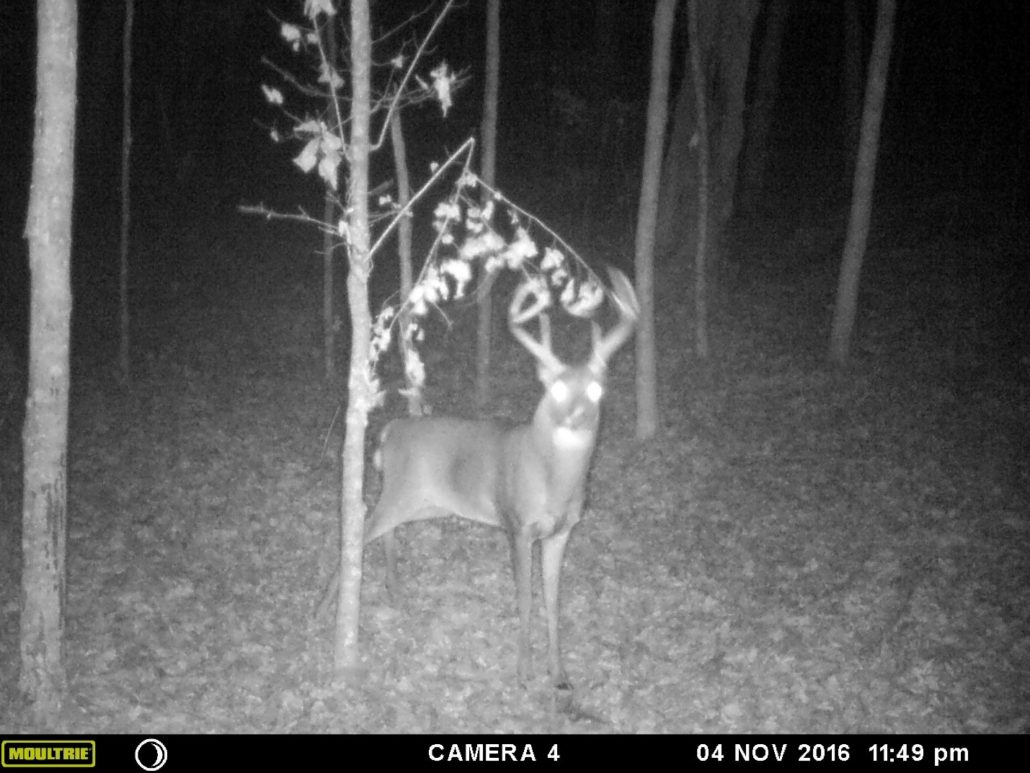
Why? – Low–quality images are simply too blurry or not detailed enough to accurately score with BuckScore®. Some cell phone pictures or any low–quality camera pictures, often from trail cameras, can lead to an inaccurate score. Inexpensive trail cameras with low megapixel images quickly become blurry when the deer gets further than 30 ft away from the camera. This is especially true if the image is captured at night. The “fuzzy” factor creates a lot of variation to exactly where a tine, circumference, or main beam measurement starts and ends. It can also throw the reference measurement off.
Photo: This image is low quality, but it also is at night. This renders the eye reference measurements useless as the glare exaggerates the eye location and width. This buck also has his ears laid back which does not allow the ear reference measurement to be taken.
Solution – The obvious solution here is to get a better camera. Most medium price range cameras offer 8-12 MP images. However, that is not going to fly with most hunters on a budget! The best option, in this case, is to bring the deer in closer. You can do this by setting up the trail camera differently on the run or food plot or simply create a point of attraction. Bait, licks, or mock scrapes are all great ways to stop a deer for a close detailed picture.
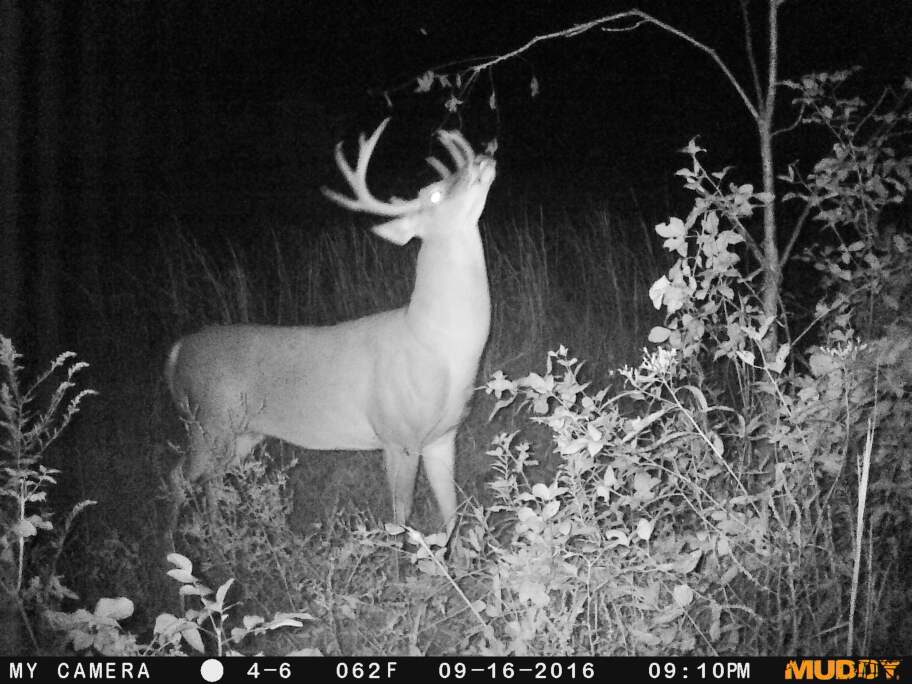
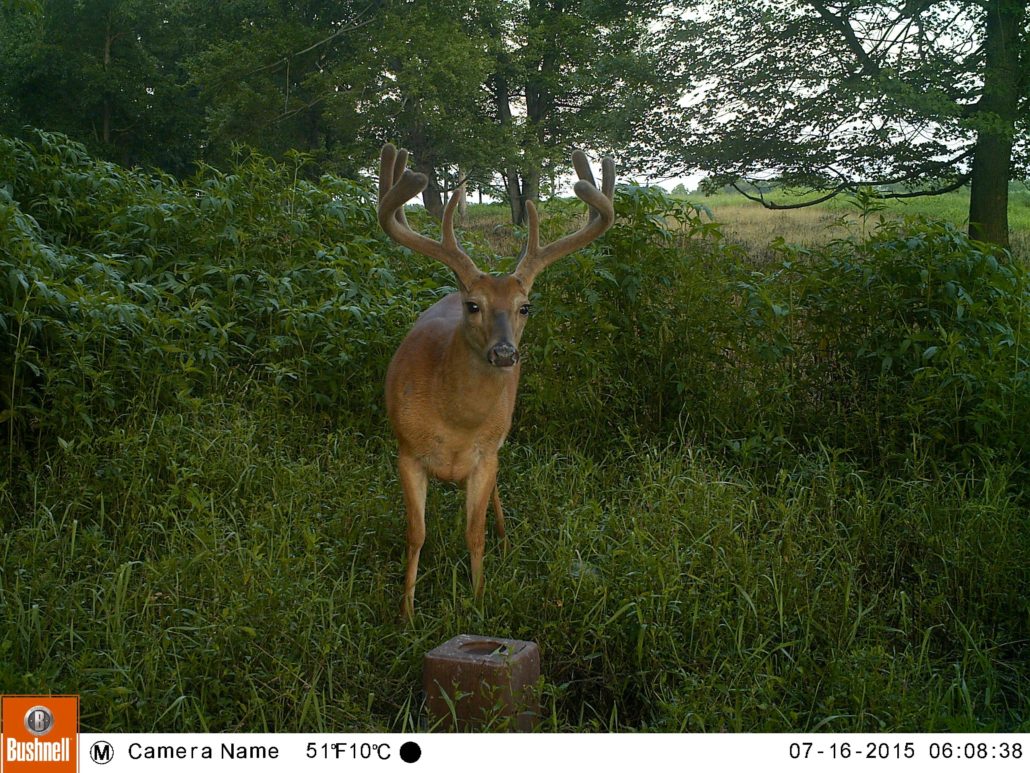
Movement
Why? –This one is pretty self-explanatory…movement causes blurry images. Blurry Images cause inaccuracy in the BuckScore® program.Even a slightly blurry picture due to movement can throw off circumference measurements and reference point measurements by an inch or more. A camera with a higher trigger speed and the ability to freeze images with a quick shutter speed is needed to capture moving deer. Higher price range cameras do a fantastic job of freezing images.
Photo: The buck in this image is not only moving, but his head is also at an angle that could significantly alter the accuracy of the score.
Solution– Try a camera with a faster motion freeze/trigger speed. If your camera is on a run, try stopping them with a point of interest, bait, scrape, or deer scent. Essentially something to stop them in their tracks!
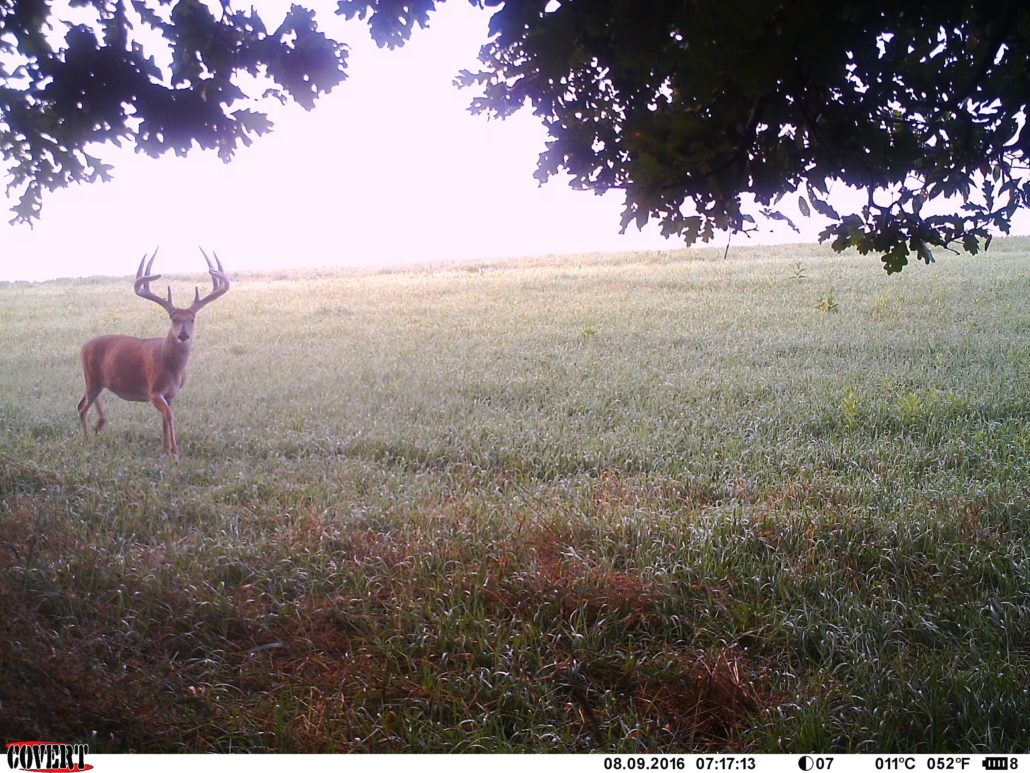
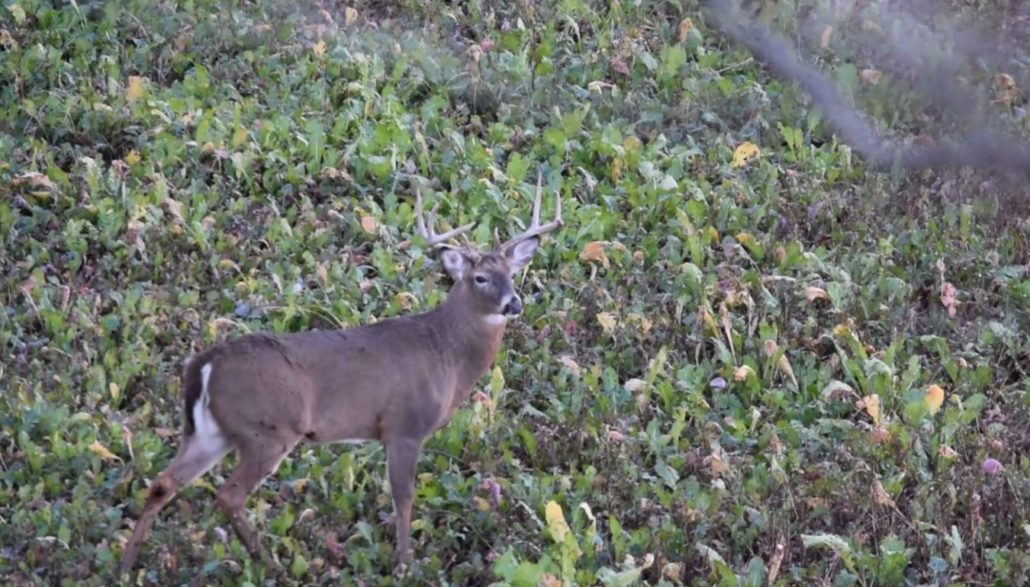
Angles
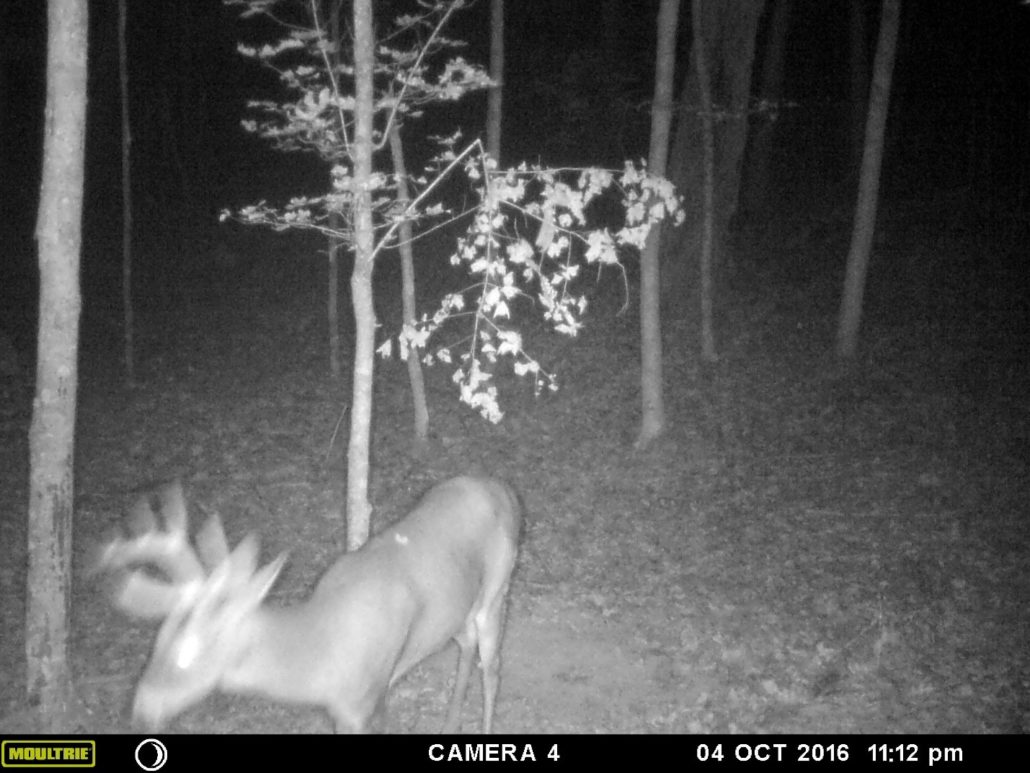
Why? – BuckScore® can accurately score images of deer at the 0°, 22° , 45°, 66°, and 90° angles. Essentially if the buck’s head is level and facing towards the camera the picture can be scored. Angles refer to not only deer facing away from the camera, but also the head being tilted forward, backward, or another variation that could cause variation in measurements. This means that bucks in the back of truck beds, lying flat on the ground, or pictures of bucks eating from bait piles cannot be scored.
Photo: In this picture, the buck is turned away from the camera. This can drastically overestimate the size of the rack and as a result, the BuckScore® results.
Solution–Making sure the trail camera is level is one easy way to make sure the deer’s head and the image is level. Of course, you can’t always get a buck to hold his head level, especially during the rut and images over bait. Having a higher burst photo mode or a video mode can allow you to make sure you drastically improve your odds of getting a shot of the buck’s head level and at the correct angles.
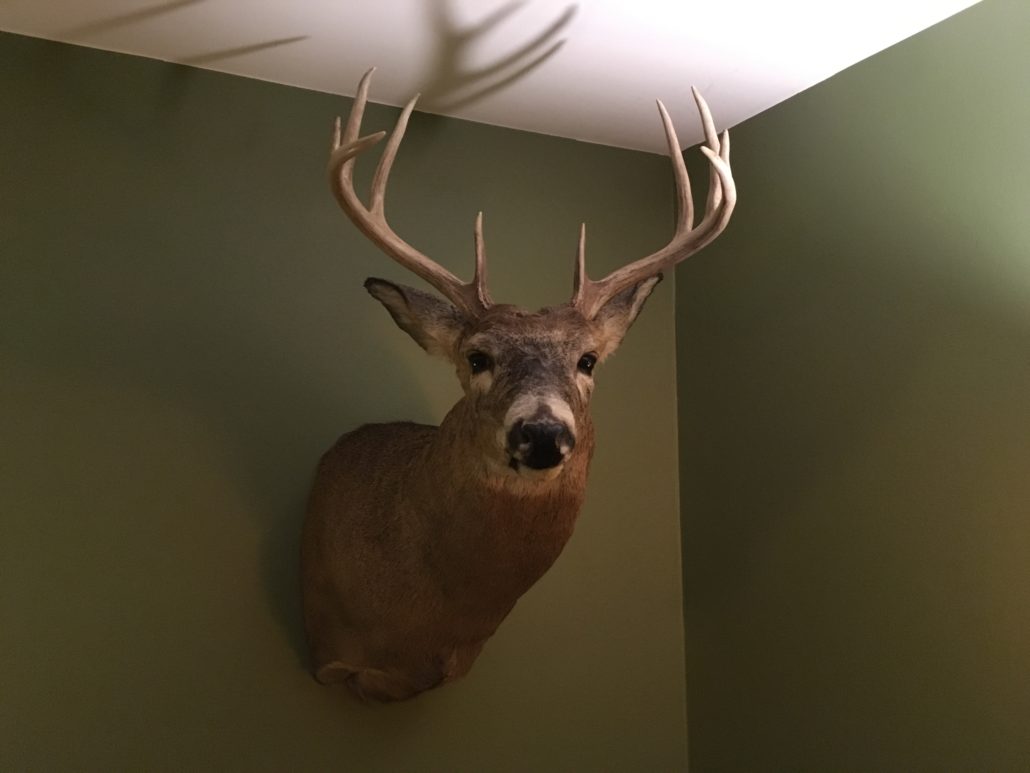
Mounted Deer
Why?– Mounted deer give you the ability to take the perfect picture for scoring deer with BuckScore®. However, the mounting process might throw off the reference measurements. While the score of the antlers remain the same, the reference features (ear, eye, and eye-to-eye) could all be anatomically incorrect. This will throw off the BuckScore® results.
Solution – Take a picture of the harvest according to the BuckScore® harvest photo guidelines. This will allow you to score a picture of a harvested deer.
5 Examples of Pictures That can be Scored
Of course, most photos can be scored by BuckScore®. These include pictures of harvested bucks or hero pictures. Take a look at some of the example pictures below. If you still have questions about scoring deer with BuckScore® contact us here.
Photo: With good camera quality, even deer far away from the camera can be scored.
Photo: BuckScore® can adjust for velvet pictures. Just simply check the box that asks if the buck is in velvet.
Photo: If you film your hunts or have a great camera in the stand with you, you can take photos or screenshots of bucks encountered in the field. Video is the best option, so you can go back and screenshot when the buck turns his head to an appropriate angle for scoring.
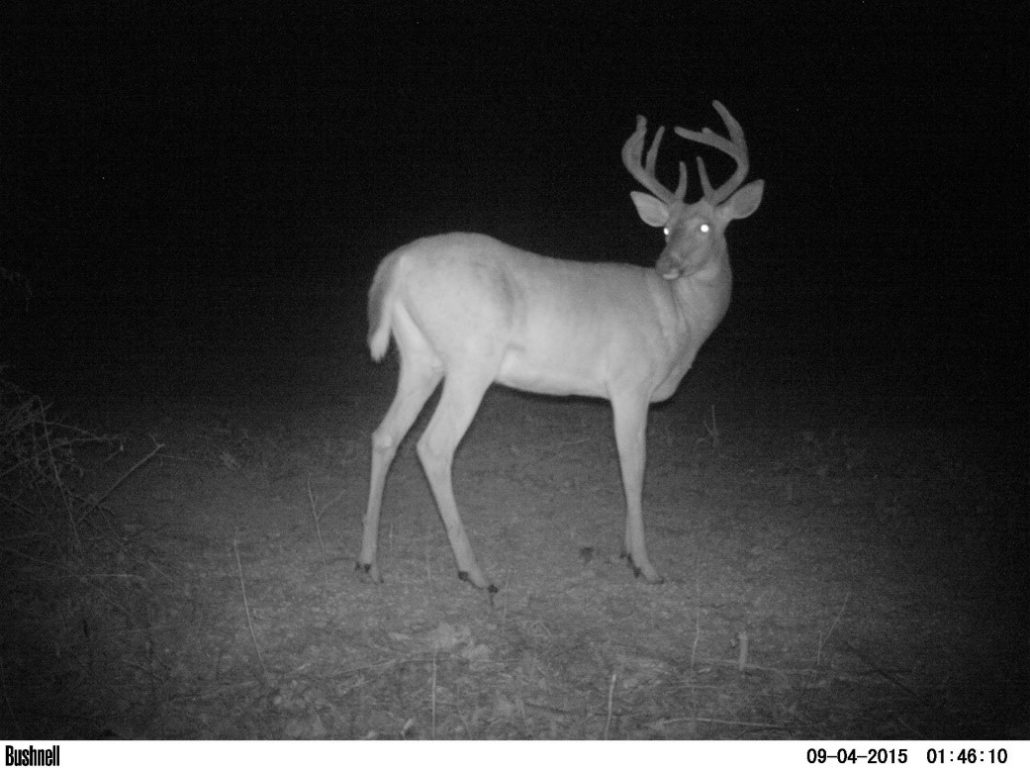
Photo: A higher grade camera allows you to get a great night time photo. With high trigger speed, shutter, and great quality you are able to capture the buck without movement and an overestimated eye glare.
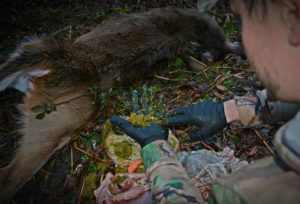
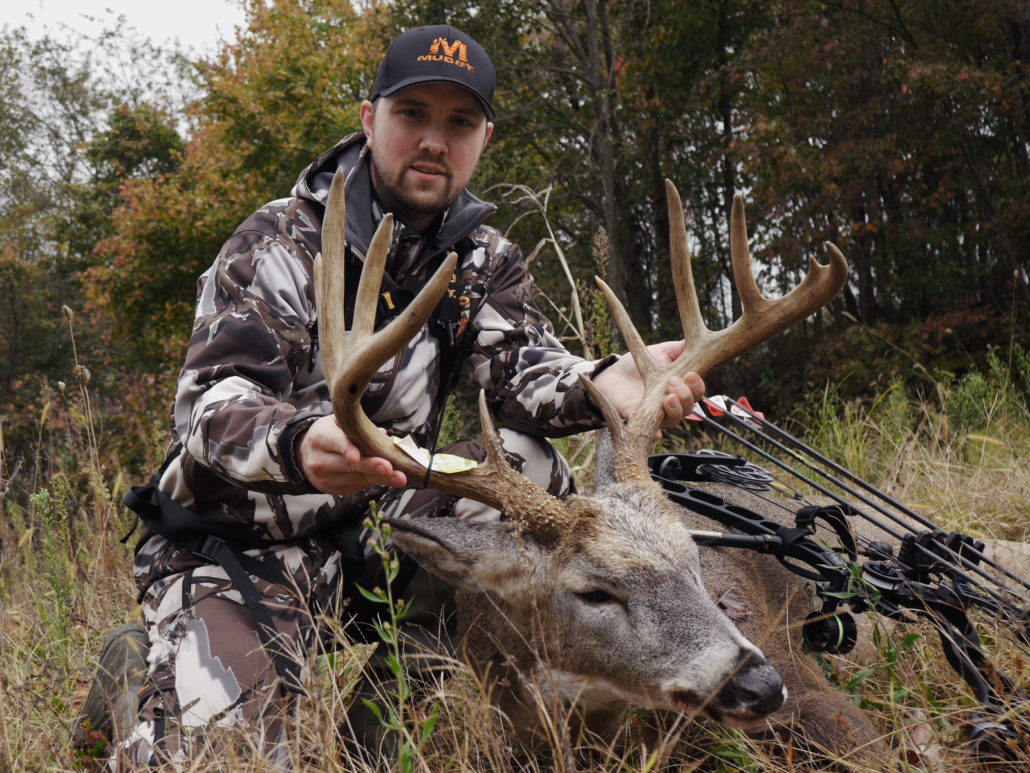
Photo: Taking a picture of a harvested deer can allow you to score the buck within minutes, without breaking out the tape!
Curious about how to take a picture of a harvested deer to score on BuckScore®? Check it out below!
https://www.buckscore.com/wp-content/uploads/2017/12/feature-1.jpg14582560BuckScorehttps://www.buckscore.com/wp-content/uploads/2024/09/buckscore-logo.pngBuckScore2017-12-07 16:52:082019-08-28 12:20:15Images That Don’t Work When Scoring Deer with BuckScore®
Scoring a Deer | How to Field Score a Whitetail Buck
While some whitetails are clearly “shooters”, as a hunter, you might often find yourself encountering a buck that is on the border of “shoot” or “don’t shoot”. Today’s advancements in trail cameras have tremendously cut back on the guesswork and these questionable encounters. It is not often that you come across a buck of significant caliber without at least having a couple of pictures of him. The addition of recent advancements in deer scoring technology now make it possible to know the exact score of the deer based off of these trail camera photos. However, there is always the possibility of the unknown. The rut, for example, is when hunters are still forced to test their skill at field scoring a whitetail. While it is not used often, the ability to field score deer is still a very important tool to have. The article below will walk you through how to quickly and effectively field score a buck. After you read through the blog, test yourself with the BuckScore® Field Scoring Quiz. The participation in the quiz will also reward you with a 50% off a subscription to the BuckScore® app. The quiz is located at the bottom of this article.
Field Scoring a Whitetail Buck
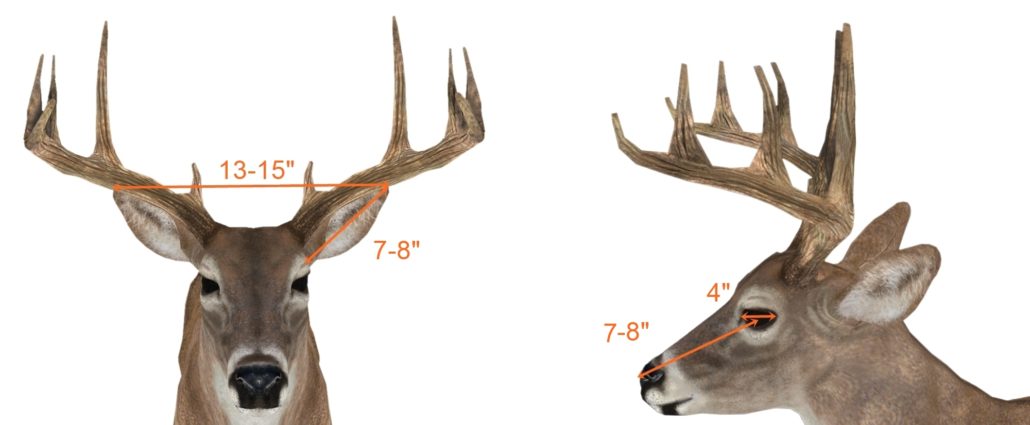
Follow along with each tip in order to find out how to properly field score a whitetail! The first step in this process is establishing your reference points. When field scoring deer, your best reference point to get an idea of the frame size will be the buck’s ears, eyes, and nose. While regionally speaking these measurements and reference points can be off, a general idea or average between regions should be used. The average measurements of how many inches each reference feature is will help you get a very accurate estimate of the buck’s score. The reference points include:
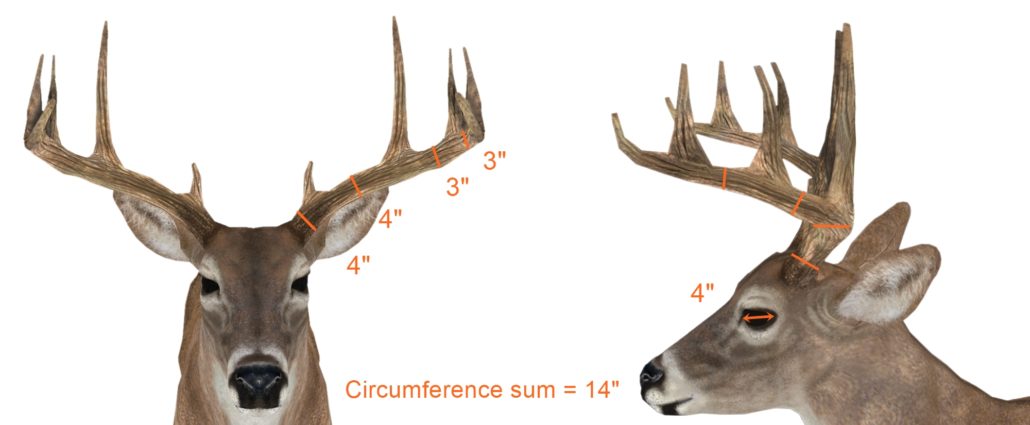
Ear Tip to Ear Tip – Ear tip to ear tip is a very important reference point in determining the buck’s spread. A frontal view is needed to get the best estimate, but generally, a buck’s ear tip to ear tip measurement will be 13-15 inches.
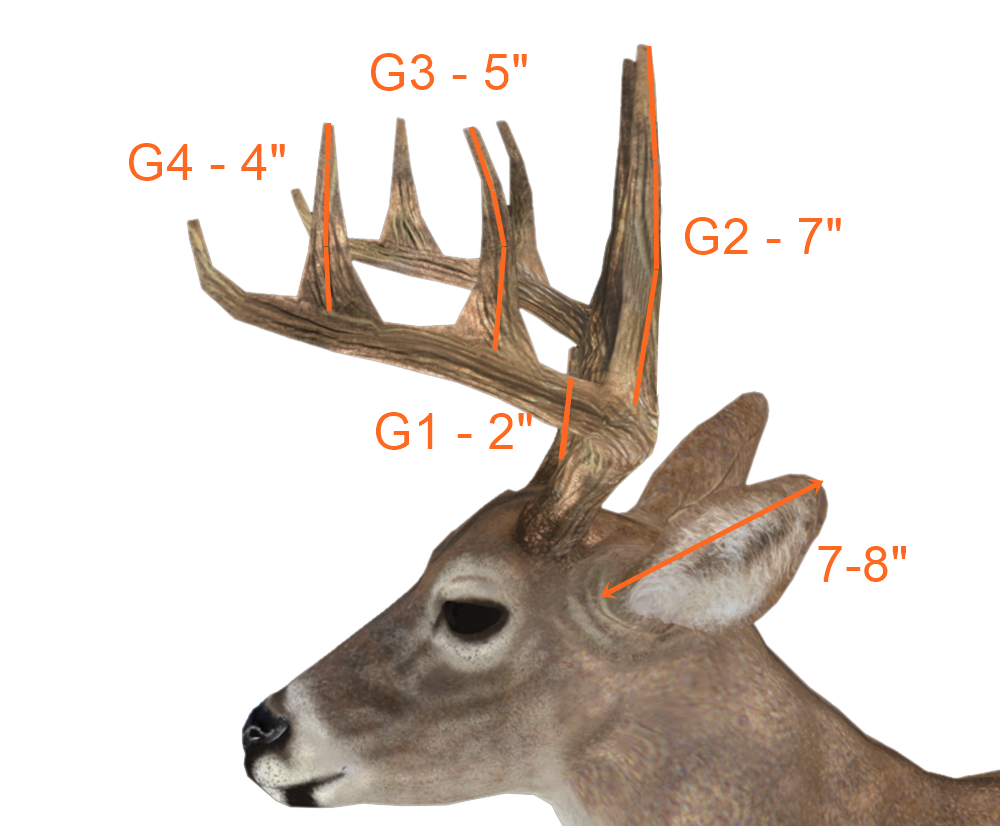
Ear Base to Tip – The ear base to tip measurement is important when figuring not only the size of the tines but the length of the main beam. Generally, a buck’s ears from base to tip will be 7-8 inches.
Eye Circumference – The circumference of a buck’s eye is a good reference point in roughly calculating your four antler circumference measurements. For this reference point, a buck’s eye is around 4 inches in circumference.
Eye to Tip of Nose – The center of the buck’s eye, to the tip of his nose is a good reference measurement when estimating main beam length. This measurement is around 7-8 inches.
After you have referenced your initial measurements you will be ready to start field scoring the buck. Take a look at the picture above to memorize the reference points. You will need them in the steps below. The first step will be estimating the buck’s spread.
The Field Scoring Shortcut
Note that the example pictures and steps below are walking you through scoring first the inside spread, but also just one side of the buck’s antlers. If the buck is relatively symmetrical, you will simply be able to score one antler and multiply it by two. By taking this shortcut and adding the measurement of the spread credit, you will arrive at a rough estimate of the buck’s score.
(Score of antler 1 X 2(if antlers are symmetrical)) + (spread) = Score of buck
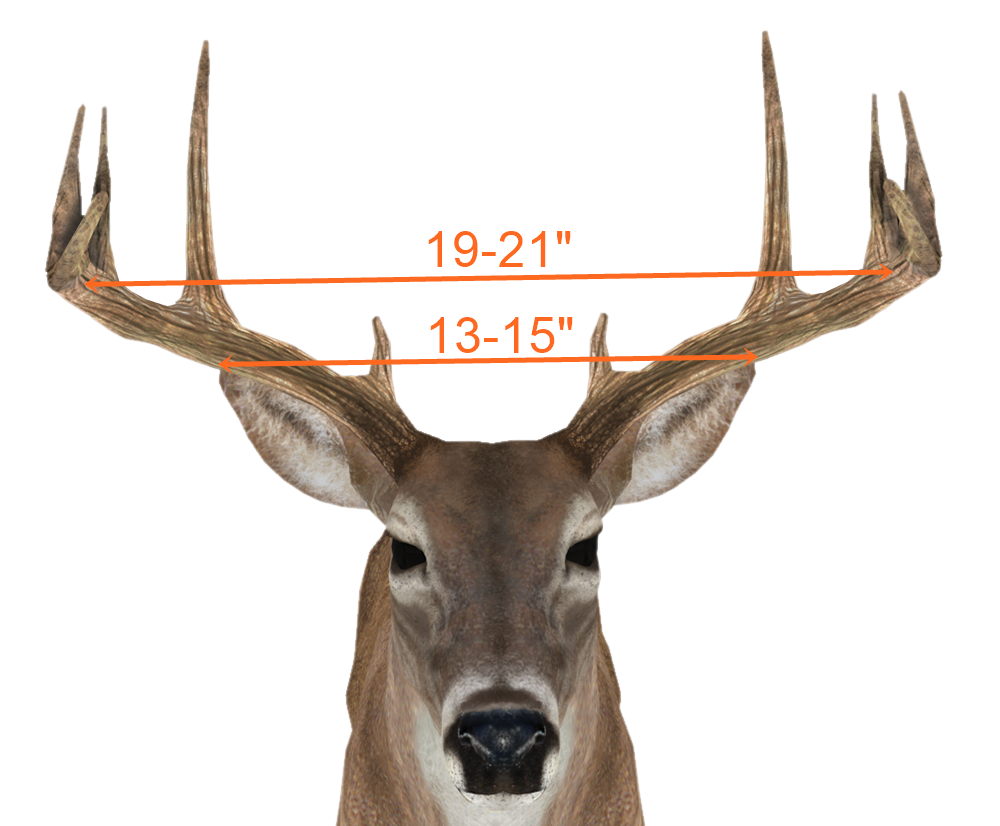
Estimating Spread
Estimating a buck’s spread credit is relatively one of the easiest scores to estimate while field scoring a buck. By using the Ear tip-to-tip reference measurement of 13-15 inches, you can quickly gather if a buck’s spread is an inch or two inside or wider than his ears. For bucks that have a spread that far exceeds his ears, simply reference the ear base to tip measurement of 7-8 inches. The picture below shows the example buck exceeding the tip to tip measurement, therefore by estimating how many inches wider the antler extends beyond we can roughly estimate the buck’s spread to be around 19 – 21 inches.
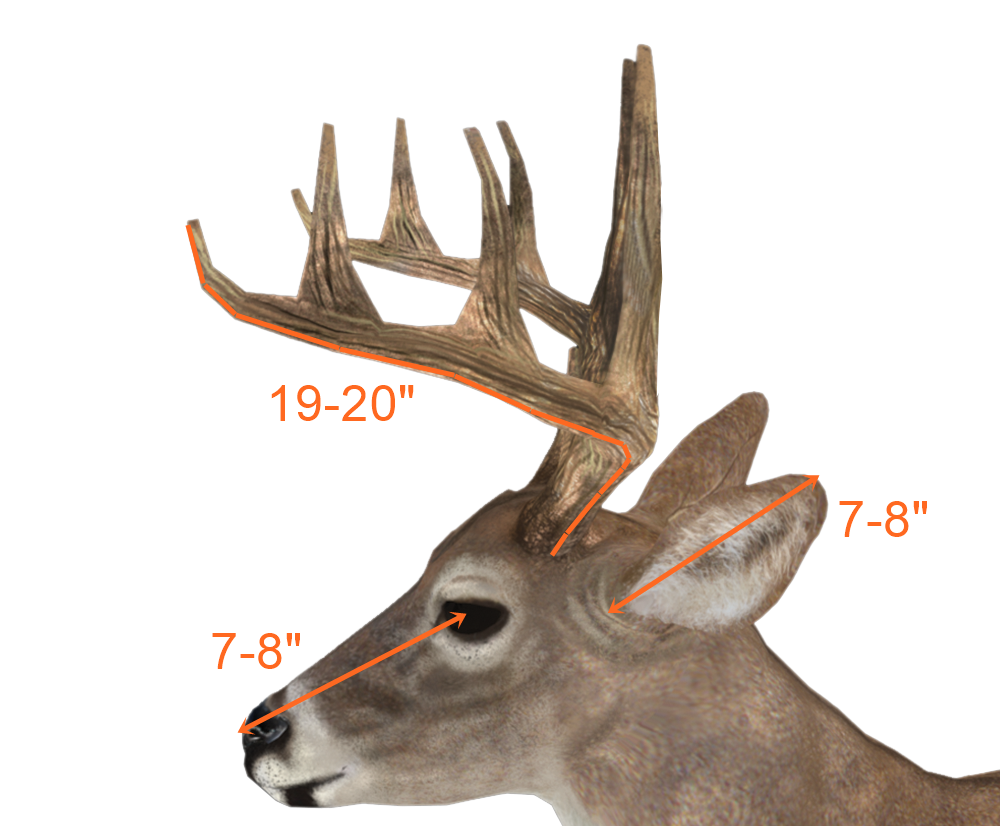
Main Beam length
Beam length is easiest to estimate from the side angle or 90 degrees. This allows you to reference the measurements of the ear (7-8”) and eye to nose tip (7-8”). Simply applying those measurements and subtracting or adding inches to how short or long the main beam is, can be the easiest way to estimate the beam lengths. In the case of this buck, the main beam is significantly longer than the ear and eye to nose tip measurements combined. Combined the reference points equal 14-16 inches, so this deer can easily be estimated to have a 19-20 inch main beam measurement.
Note: Be aware that significant “upturned” main beams or, for instance, when the main beam sweeps in and is close to touching tips with the other main beam, will potentially skew your estimates. In an ideal encounter with a buck, you would receive frontal and side views, allowing you to judge, in inches, how much the main beam may be skewed from the side view.
Tine Lengths
Tine lengths, while they may seem easy, are actually quite difficult to estimate. They are the furthest from the reference points but also can be subject skewed estimations based on view angles, or when additional points on the tine are present. Remember that for a point to count towards the whitetail’s score the tine must be at least one inch. The easiest point to reference tine length is the ear base to tip measurement. By estimating how much longer or shorter each tine length is (G1, G2, G3, G4, etc.) than the ear measurement of 7-8 inches, you can quickly gather a rough sum of the tine measurements. This buck’s tines can roughly be summed to roughly 18 inches.
Estimating Mass
Without the reference measurement of the circumference of the buck’s eye at 4 inches, judging the four antler circumference measurements would be difficult. All bucks, regardless of how many tines they have always will be measured with four circumference measurements. Four pointers, six pointers, or even spikes will all need four evenly distributed measurements of antler circumference. The circumference measurements are measured between:
Halfway between the base and the G1
Halfway between the G1 and the G2
Halfway between the G2 and the G3
Halfway between the G3 and the G4
To estimate the buck’s circumference measurements simply judge how much smaller or bigger the antler’s circumference is from your reference point of the buck’s eye. If the antler looks roughly ¾ of the eye circumference it is most likely in the 3-inch range. If it is roughly 1.5X the circumference you will ballpark the circumference measurements in the 5.5-6 inch range. The example buck can be judged at essentially the same mass for the first two measurements between the base and G1, and the G1 and G2. These measurements would be somewhere in the ballpark of 3.5-4 inches. The third and fourth circumference measurements are around ¾ the size of the eye so can be estimated to be around 3 inches. The sum of the example buck’s circumference measurements is 14 inches.
Adding the Measurements
After you estimate each of the antler measurements for one side of the buck’s antlers, you are ready to either score the other side or you can take a shortcut. If time allows (it often does not) and if the buck is generally symmetrical, you can simply multiply the sum of the antler measurement by two. For this buck, a very symmetrical buck, we can total the antler measurements to be roughly 51-52 inches. By multiplying 51-52 inches by two, taking the shortcut in estimating the score of the other antler, we can arrive that this buck’s antlers are around 102-104 inches.
We then add the 19-21 inch spread credit of the buck to come to a rough estimate that this buck’s score is 121- 124 inches. This put’s the buck into the 120-inch class, but more specifically the 120-125 range.
Is That Estimate Correct?
You do not get the luxury of confirming your estimations in the field while hunting. However, you can do two things to greatly improve your odds at estimating the buck’s score correctly. You can practice field scoring pictures or videos of known bucks, or you can get ahold of the BuckScore® program. The BuckScore® program allows you to score a buck’s antlers based on any picture. This picture can be a trail camera picture, a harvest picture, or even a freeze-frame of a video if you happen to film your hunts! We scored this buck using the BuckScore® program. The results are posted below. The example buck’s antlers grossed at 121.988 or simplified to 122 inches.
Are You Ready to Field Score a Buck?
Test your ability at field scoring whitetails by taking the BuckScore® field scoring quiz. You will watch a quick video encounter with a buck and be given 4 multiple choice options of scores. There are 10 bucks to score with a time limit of 10 minutes for the entire quiz. This allows you 1 minute to score each buck, about all the time you might receive in a real hunting scenario. Once you have completed the quiz, you will to receive the actual BuckScore® certified score of the bucks, your quiz results, and a 50% off code on your first month of your BuckScore® subscription!
Still Not Confident Field Scoring Deer? Go Mobile!
BuckScore® Mobile, now allows you to score deer with your phone! This now allows real encounter scoring. Within minutes of snapping the picture, you can have a score of the deer before he even offers you a shot opportunity!
To provide the best experiences, we use technologies like cookies to store and/or access device information. Consenting to these technologies will allow us to process data such as browsing behavior or unique IDs on this site. Not consenting or withdrawing consent, may adversely affect certain features and functions.
Functional
Always active
The technical storage or access is strictly necessary for the legitimate purpose of enabling the use of a specific service explicitly requested by the subscriber or user, or for the sole purpose of carrying out the transmission of a communication over an electronic communications network.
Preferences
The technical storage or access is necessary for the legitimate purpose of storing preferences that are not requested by the subscriber or user.
Statistics
The technical storage or access that is used exclusively for statistical purposes.The technical storage or access that is used exclusively for anonymous statistical purposes. Without a subpoena, voluntary compliance on the part of your Internet Service Provider, or additional records from a third party, information stored or retrieved for this purpose alone cannot usually be used to identify you.
Marketing
The technical storage or access is required to create user profiles to send advertising, or to track the user on a website or across several websites for similar marketing purposes.