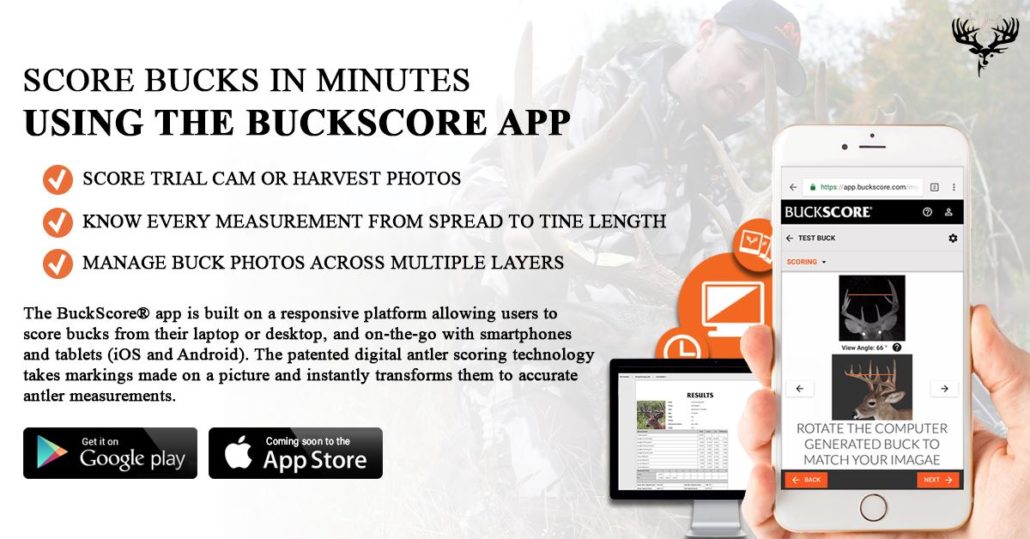
How to Upgrade Your BuckScore Account for Aging Bucks
BuckScore, a patented deer antler scoring app used by managers, researchers, and hunter’s alike is now proud to bring you an all new patented buck aging feature. Take your current account or start a new account with the advanced billing plan to access this new technology. Here is a step by step guide on upgrading your account to access the aging feature.
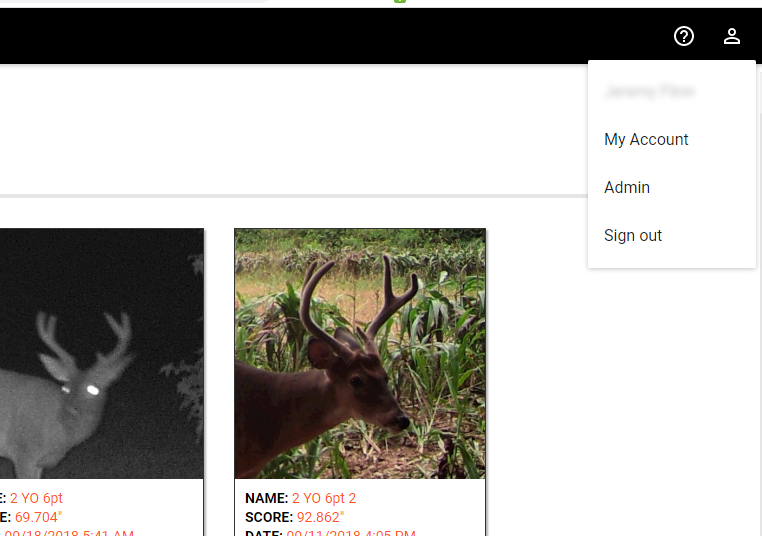
Step 1: Login or create a new BuckScore Account, and select “My Account” from the menu
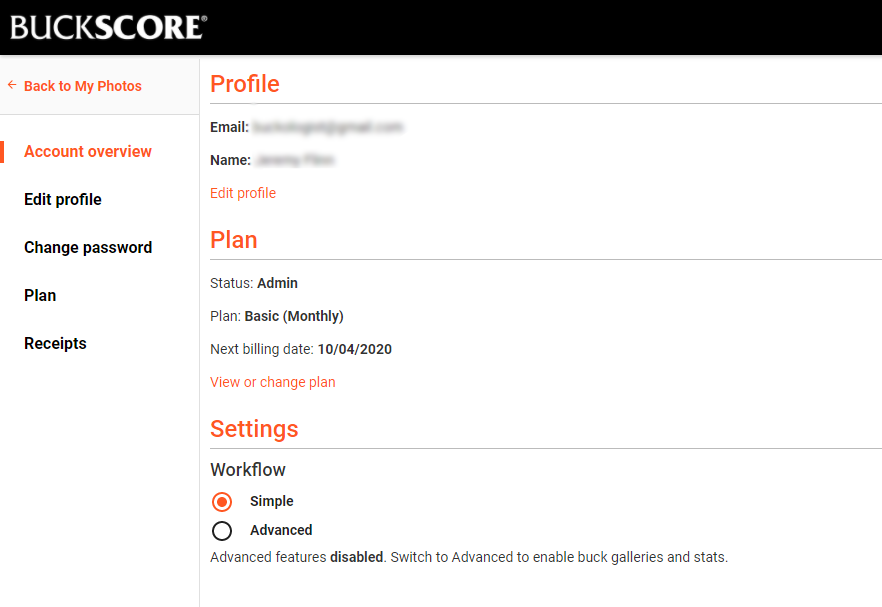
Step 2: In “My Account” select to change your “Plan” from the menu on the left of the screen:
Step 3: Select to change my plan
Step 4: Advanced Monthly or Yearly Plan to access the Buck Aging Feature.
A Month
Basic – Scoring deer – $3.99
Advanced – scoring and aging – $5.99
A Year
Basic – Scoring deer – $39.99
Advanced – scoring and aging – $59.99
After you have changed your billing plan you can start aging
Jeremy Flinn is graduate of the MSU Deer Lab and is now the Chief Marketing Officer for Stone Road Media, a company that represents many of the well-known brands in the hunting industry. We talk about the influence “brand-name” hunters have on the education of the hunting public and how Jeremy is working to insure that accurate, biologically sound information is being distributed. We also talk about habitat management differences in the Northeast, Southeast and Midwest, and how Jeremy uses biological knowledge about buck movements, complimented with camera technology, to most effectively scout and harvest deer. If you would like to reach out to Jeremy, you can find him at jeremy@stoneroadmedia.com.
https://www.buckscore.com/wp-content/uploads/2019/02/P1150710-1-scaled.jpg19202560BuckScorehttps://www.buckscore.com/wp-content/uploads/2024/09/buckscore-logo.pngBuckScore2019-02-07 20:01:142019-08-28 12:20:09MSU Deer Lab Podcast Episode 033 with Special Guest Jeremy Flinn
Most serious buck hunters have taken the effort to pattern a nice buck, only to be frustrated when they never saw him again in the original area. In Part 1 of Here Today, Gone Tomorrow, we explained that many adult bucks shift their area of use during the hunting season in response to several needs related to food and reproduction. Here we take learning to an entire new level as we describe personality differences that explain some of the most bazar behaviors you may have experienced on your hunting grounds.
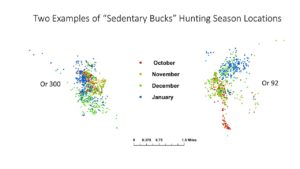
The MSU Deer Lab’s ongoing movement project is generating location estimates every three hours for up to 50 adult bucks each year across a large landscape dominated by forests and agriculture. Graduate students Ashley Jones and Colby Henderson are just getting started with their analyses, but our preliminary results prove that you should NEVER say “always” and ALWAYS say “maybe” when it comes to predicting buck behavior. However, there appears to be two general types of adult buck personalities that we can tie to general patterns of movement. About 60% of our adult bucks live in one general area or home range, and we call these “Sedentary Bucks.” The other 40% of our adult bucks split their time between two or more areas or home ranges, and we call these “Mobile Bucks.”
Orange 300 and Orange 92 are both 3-year old bucks that exemplify the relatively sedentary movement pattern present in 60% of our collared bucks. They live in a single general area, although they shift their movements across their hunting season home range in response to food resources and potential breeding opportunity. They also make short excursions outside of their normal home range, likely to evaluate potential new opportunities. Don’t take the term “sedentary” to suggest that they don’t move much – looking at the scale in this figure shows that each of these bucks’ hunting season home ranges cover a range of 3-4 miles!
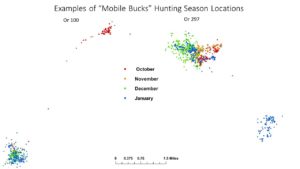
Orange 100 and Orange 297 are three-year-old bucks that also shifted concentration areas within their hunting season home ranges, but the extent of their shift differentiates them from the Sedentary Buck Personality. These two examples of the Mobile Buck Personality made significant movements between two home range areas separated by up to 7 miles. Some Mobile Personalities make a single movement between their two home ranges while others make regular visits back and forth.
These extreme shifts in home range location explain why bucks patterned on one property may end up being harvested many miles away on another property. Stay tuned for more valuable buck behavior insights as we continue to analyze data from this monumental adult buck movement project.
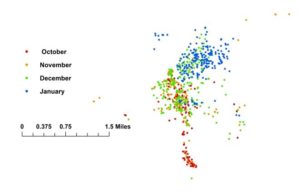
Adult Buck Movement Study | Shifting Buck Home Ranges
By: MSU™ Deer Lab
Most serious buck hunters have located a nice buck prior to or early in the hunting season and invested time and effort trying to bring him home. Many of these same hunters have experienced the frustration of never seeing him again in the original area and wondered why. Did he move because of your scouting and hunting efforts or was the shift in the buck’s home range part of normal buck behavior? Well, the MSU Deer Lab’s ongoing adult buck movement project is generating buck location estimates across a large landscape. Graduate students Ashley Jones and Colby Henderson are just getting started with their analyses, but our preliminary results show the cause of your frustration when it comes to shifting buck home ranges.
Look at the movements of a 3-year old buck (Orange 92) during the 2017-18 hunting season and you’ll notice a distinct shift in areas of concentrated activity across the hunting season. Each dot is a location estimate sampled at three-hour intervals and color-coded by month to illustrate changes in home range use across the hunting season.
Orange 92’s October locations (red dots) have nothing in common with his January locations (blue dots). Examining the November (orange dots) and December (green dots) locations shows that his home range shift was a graduate transition that took place over two months. This pattern is present in many of our collared adult bucks. A closer look also shows two important and common movement behaviors associated with the rut, which peaks during late December and early January on this study area. First, are the excursions or short-term movements outside of his normal home range during November, as he likely seeks out an opportunity to breed an estrus doe. Second, note the greatly expanded movements during December and January as he moves more widely and regularly in search of does in estrus and expands his home range to double that of pre-rut. He evens takes a short return trip down into the lower portion that he used extensively during October.
Adult bucks are creatures of habit but thank goodness for our sport, predicting their locations with accuracy is difficult. Future updates will expand on our new knowledge of how buck movements can actually be classified into personality traits!
https://www.buckscore.com/wp-content/uploads/2019/02/shorttop-scaled.jpg13602560BuckScorehttps://www.buckscore.com/wp-content/uploads/2024/09/buckscore-logo.pngBuckScore2019-02-07 14:54:092019-02-07 19:35:32Here Today, Gone Tomorrow (Part 1): Shifts in Buck Home Range Areas
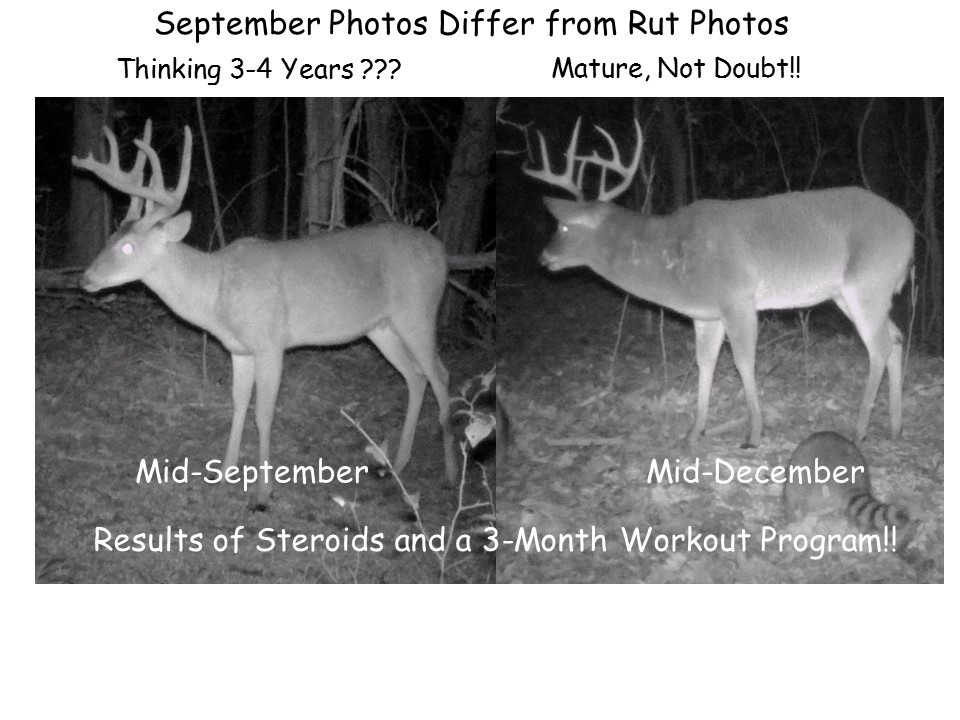
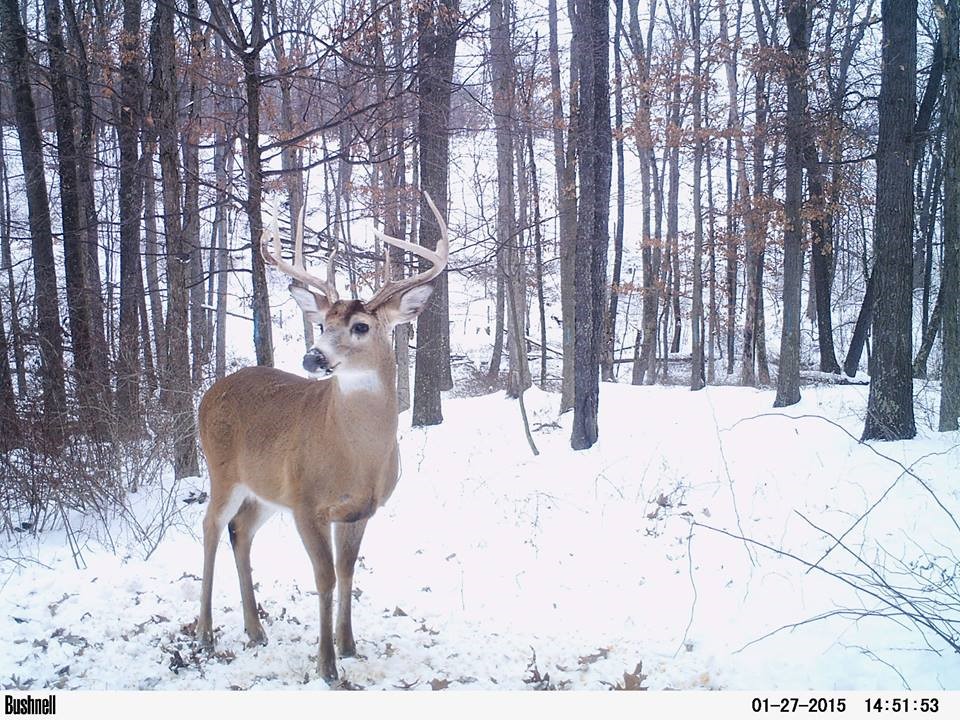
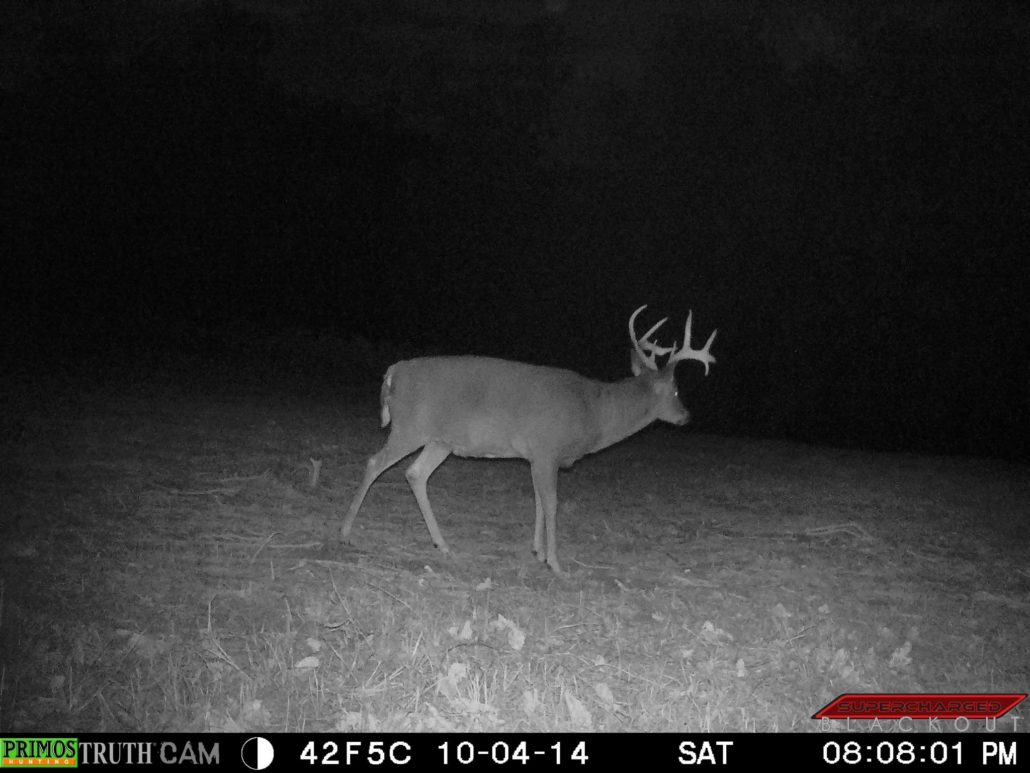
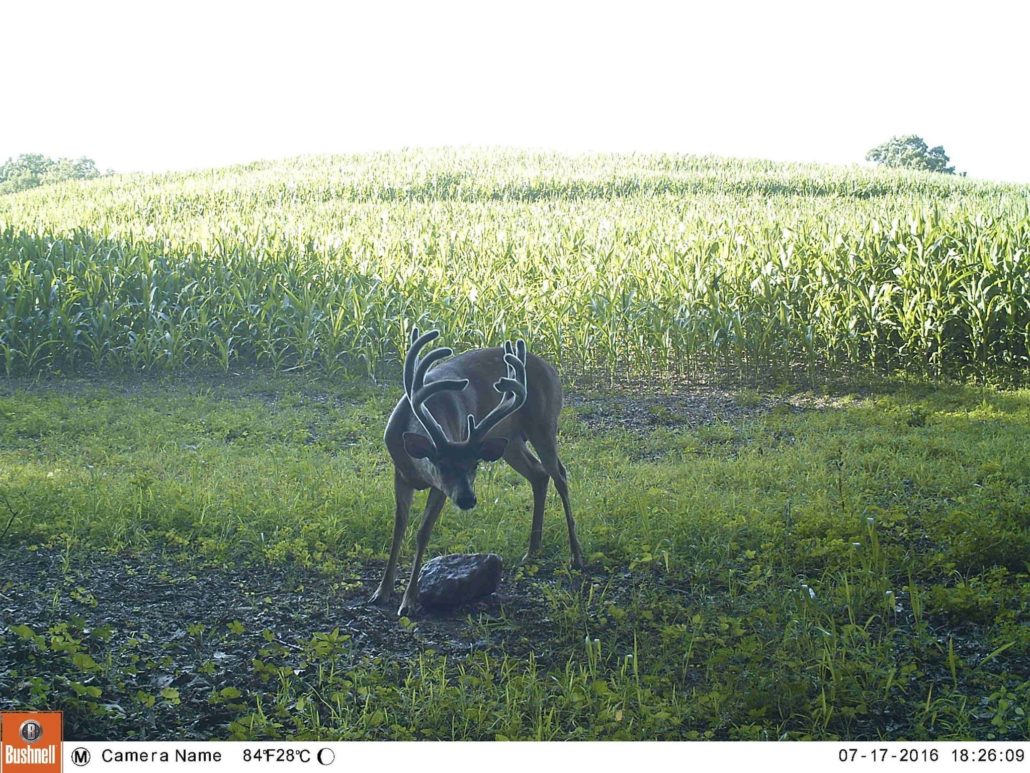
Estimating age of photographed bucks can be difficult enough due to less-than-ideal body alignment in the photos. Combining that with seasonal changes in body shape will really increase difficulty. Bucks change dramatically between the early fall compared to when they are primed for the rut, so always consider the date relative to you area’s peak rut. Bucks relax during the summer, putting extra nutrients into body fat and rapidly growing antlers. His interests and activities change once testosterone levels increase dramatically in August, leading to antler hardening and shedding of their velvet during mid-to-late September.
This buck photographed in mid-September has a relatively thin neck, which makes you think he’s 3-4 years old. His antlers look huge, but remember velvet antlers always appear to be larger than fully hardened antlers. Note how much different he looks in December – his neck is much thicker, a result of steroids (testosterone) and 3 month of serious exercise (rubbing, scraping, traveling, and fighting). But, also note his thinner hind quarter in December, which is the result of his reduced feeding activity during his increased exercise (sounds just like most human weight-loss programs!).
https://www.buckscore.com/wp-content/uploads/2019/01/aging-deer-mississippi_feature.jpg720960BuckScorehttps://www.buckscore.com/wp-content/uploads/2024/09/buckscore-logo.pngBuckScore2019-01-24 20:58:232019-08-28 12:20:10Why You Should Consider Seasonal Body Changes When Aging Bucks
Many of us are settling in to the heart of winter, which means dealing with the brutal cold and snow. Most people have a friend or family member that can barely make the trip from their vehicle to their office without complaining about how cold it is. Lucky for them, they have the luxury of climate control! White-tailed deer aren’t so lucky. They endure the cold and snow 24 hours a day, 7 days a week. It’s no surprise that winter can be a devastating time for deer, so how do they survive? This article will discuss some of the adaptations deer have to help them through winter weather.
Fall and Early Winter Feeding Habits
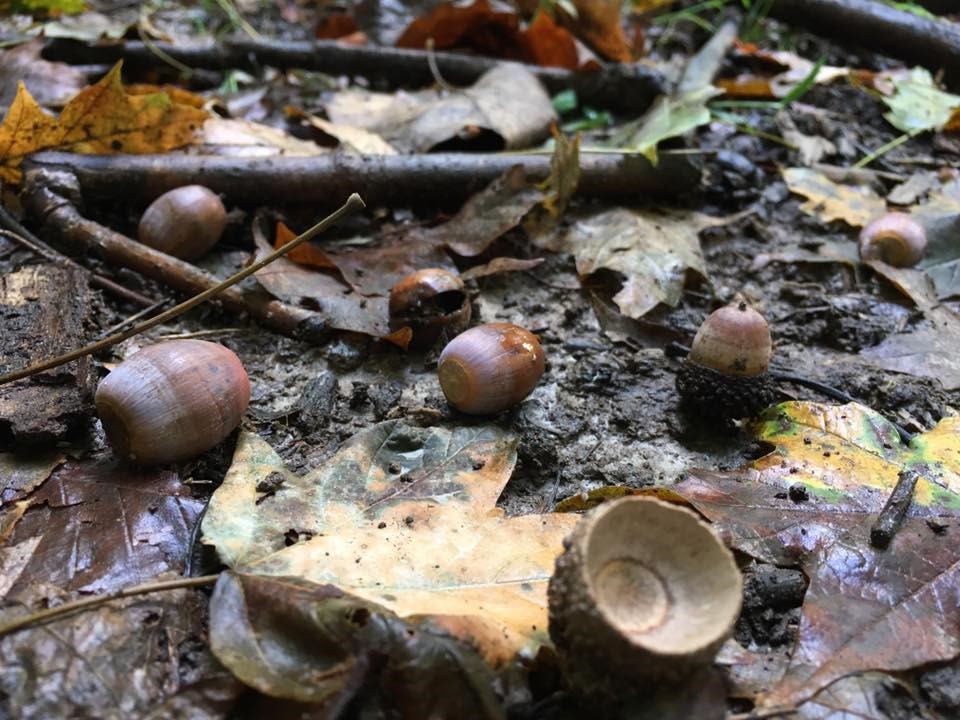
Surviving the dead of winter is no easy task, as such, deer begin preparing for winter in the fall months. This is when both bucks and does push to put on weight by eating high fat foods like acorns when they are available. But it’s not only the foods they eat that help them put on a layer of fat. Deer also display what’s called an obligatory weight response. Essentially, all deer will start converting food to fat to prepare for winter, regardless of the quality of nutrition they have available. This is just one adaptation deer have to help them prepare for the coming winter months.
In particular, bucks have it pretty rough during this time period because they can lose up to 25% of their body weight from chasing does during the rut. This, in part, is why you see mature bucks hitting food sources during daylight in December. They have to try to replenish some of the fat reserves they lost during the rut so they have a chance to survive the rest of the winter.
January
Although January may seem like a brutal winter month to you, it is just the start for deer. Luckily, most deer still have plenty of their fat reserves to burn through in January, but deer also have some other strategies to help them conserve energy during this month.
Once temperatures start plummeting and snow depths increase, deer dramatically change their behavior. Deer will herd-up and move more during daylight hours to help conserve energy they need to maintain their body temperature. Deer will also start hitting high-energy content food such as soybeans or cornfields. These high-energy food sources won’t necessarily help replenish their fat reserves, but they will help deer maintain the caloric intake they need to survive the day.
Although many of us envision herds of deer feeding in a picked soybean or cornfield during the winter, agriculture only accounts for a portion of a deer’s diet. So what else are they eating during this energetically demanding time? Woody browse is the answer. So what is woody browse? Woody browse is pretty much exactly what it sounds like. It’s any type of woody vegetation where deer can browse on the tips or terminal buds of the plant. The type of woody browse species a deer prefers depends on what part of the country you find yourself in but some examples of high quality woody browse species in northern states are aspen seedlings, eastern hemlock, and if you find yourself in the far north, Canada yew. In fact, regardless of the amount of agricultural crops available in your area, woody browse will still make up at least 40% of a deer’s diet. Deer have adapted over hundreds of years to eating woody browse and this type of forage helps maintain the pH level in their highly complex four-chambered stomach. The importance of woody browse to a deer is exactly why deer biologists and managers stress the need for habitat management. The more habitat management you engage in, the more woody browse there is available to deer.
Another thing most people don’t consider is how difficult it is for deer to consume enough waste grain from soybean or corn fields to survive. Throughout most of the year, deer need to consume 6 to 10 pounds of food per day. Luckily, a deer’s metabolism slows down during the winter months so they don’t need to consume as much food. But still, it’s hard to fathom how many kernels of corn or bean pods it would take to weigh even 3 to 6 pounds. Now combine that with the fact that most agricultural fields are plowed after harvest, making finding waste grain even more difficult. It’s easy to see why woody browse is so important!
February
Most people realize how brutal February is for winter weather. Blizzards, snow, cold temperatures, and heavy winds can make for some nasty days during this month. But February can also bring some nice weather giving you hope that spring is right around the corner. However, this isn’t necessarily the case for deer. Deer have already burned through a lot of their winter fat reserves during January, so February can be the start of trouble.
Migrations
You may not think of white-tailed deer as a stereotypical migratory species. Generally, when people think of migratory species of ungulates, they think of caribou, elk, pronghorn, or mule deer. Biologists have known for a while that deer in far northern states like Minnesota, Wisconsin, Michigan, Pennsylvania, and New York will herd up and migrate during late January and February to yarding areas. These yarding areas allow hundreds of deer to congregate which helps them survive the winter. Yarding areas historically provided woody browse to deer, but also allowed deer to create travel corridors into and out of the yarding area. These travel corridors consist of beaten down snow paths that allow for easy travel. Easy travel also allows deer to more easily escape predators such as wolves. Finally, yarding areas also provide deer with an increased ability to thermoregulate, or maintain their body temperatures, by providing cover and allowing for several animals to bed next to each other.
Although deer migrations in the north woods are common and have been documented for a while now, deer in agriculturally dominated regions like the Dakotas and southern Minnesota were not thought to migrate during the winter months. But recent research has shown that in states like North Dakota and South Dakota, a high percentage of deer will still migrate over winter. We generally think of the Dakotas as being agriculturally dominated regions, so why would deer need to migrate? Well research hasn’t quite nailed this one down, but one of the most logical hypotheses is related back to food and cover. As already mentioned, many agricultural fields are plowed immediately following harvest. This leaves a barren landscape as agriculture can comprise up to 60% of land use in some of these regions. Regardless, deer may still have plenty of resources to carry them through most of January and into February, but what happens when the food runs out? You guessed it! It’s time to find greener pastures, quite literally. So even deer in agriculturally heavy regions will migrate to find the necessary resources to survive the rest of winter. Although food is at the top of the list, don’t discount the importance of cover during winter months. Research from the Dakotas has also shown that the probability of adult does migrating decreases with increasing amounts of forested areas found within their winter home range. This emphasizes not only the importance of forested areas in helping deer thermoregulate, but also emphasizes the potential importance of woody browse during the winter months.
March
In like a lion, out like a lamb. This old adage describes why March marks the danger zone for overwinter survival of white-tailed deer. Regardless of how severe the December, January, and February months were deer are actually pretty well equipped to survive these months regardless of what type of winter weather is thrown at them. Deer burn through their fat reserves slow and steady. Then March hits. The beginning of March is still generally cold and nasty meaning deer are still having to use the last bit of their stored fat reserves. Usually by the end of March temperatures are warming up and snow is melting. Warming temps means deer need to use less energy to keep warm and also means that snow is melting. Decreasing snow depths means deer can find food easier because they don’t have as much snow to paw through to reach it. As long as temperatures steadily rise throughout March, then deer will be in the clear and will likely survive another winter. But what if severe winter weather persists throughout March?
Most biologists agree that it’s not necessarily the winter severity of January and February that can be deadly to deer, rather it’s how long severe winter persists into the spring. Deer have adapted to store enough fat reserves to survive the previous months and then to start replenishing those reserves once spring hits in late March and April. However, if severe winter weather continues to persist throughout March then deer can find themselves in trouble. By late March, most food resources have been depleted, regardless of the available food resources in that region. This means that if a deer can’t find any food then they are in real danger of starving. So what can you do help deer through this stressful period?
The Do’s and Don’ts of Feeding Deer
Unfortunately, there are more don’ts than do’s when it comes to trying to help deer survive a brutal winter. The biggest don’t is NOT to feed deer a high quantity of high energy foods like shelled corn. It’s the same story every year; you hear about somebody with good intentions putting out shelled corn for deer to help them survive the winter but then find several deer dead just feet away from the corn pile. You may be asking yourself why deer can survive just fine eating waste grain and standing corn, but shelled corn represents a major threat to survival? Well believe it or not, although corn represents a high energy food source that can help deer survive energetically stressful time periods like winter, in general, corn is not the best food for deer. That’s because corn is hard to digest and changes the pH of their stomach. In turn, the bacteria composition needs to change in a deer’s stomach to help them digest the corn. When deer are feeding on waste grains, they generally aren’t consuming enough corn at a fast enough rate to do any harm. And when deer are feeding in standing corn, they are also usually consuming parts of the corn stalk that serves as roughage and helps a deer maintain the pH in their stomach. The issue is when deer have essentially unlimited access to shelled corn. They will eat too much corn without having any roughage available, which increases the pH in a deer’s stomach so fast that it can kill the deer. This change in pH is known as acidosis causes deer to die almost instantly. Although these people have good intentions, their actions prove to be deadly.
Generally speaking, there is more harm than good that comes from feeding wildlife. So avoid feeding deer with piles of corn to help them survive harsh winters. But don’t worry, it’s not all doom and gloom because there are a few things you can do to help deer survive the winter, particularly if you have the ability to manage your hunting property.
One of the easiest things you can do is to plant some food plots into corn or beans and leave them stand throughout winter. Depending on the size of the plot they may serve as an important food resource throughout winter. If you don’t have the ability to plant food plots where you hunt but there is still abundant agriculture, then talk to the farmer about working out a deal to leave some standing corn or beans. This may be something as simple as paying the farmer for their losses of not harvesting a certain amount of crops. Who knows, you may even get lucky and the farmer will do it at no cost to you.
A more permanent fix is engaging in habitat management. Talking with your area wildlife biologist and area forester will help you to better understand what parts of your timber and which specific trees may need to be cut. Cutting timber to improve habitat may seem counterintuitive, but in reality, cutting timber allows sunlight to hit the forest floor and initiates the growth of the understory. High quality deer browse will regenerate, including important woody browse species. Remember, a deer can’t eat anything higher than five or six feet off the ground so if you walk into your woods and can clearly see for a hundred yards or more without any vegetation obstructing your view, then you aren’t providing any food or cover to your deer herd. Habitat management takes a lot of effort, but also has long-term benefits.
Believe it or not, deer have several adaptations and are fairly well equipped to survive the winter months. But even with all of these adaptations, they can still find themselves in trouble if winter weather persists into late March and April. Although you should avoid feeding deer to help them survive, there are a couple of things you can do if you are worried about deer making it through the winter on your hunting property. If you have the ability to do so, make sure you’re leaving crops like soybeans and corn standing throughout the winter. These are high-energy content foods and will help deer survive. You should also consider conducting habitat management to provide cover and woody browse throughout these months. Deer are amazing animals and hopefully this article helps you better understand how they can survive brutal winters!
https://www.buckscore.com/wp-content/uploads/2019/01/BuckScore_FeatureImage.jpg596960BuckScorehttps://www.buckscore.com/wp-content/uploads/2024/09/buckscore-logo.pngBuckScore2019-01-16 14:42:122019-01-16 14:50:46Strategies Deer Use to Survive the Winter Months and What You Can Do to Help Them
Aging Deer on the Hoof, Jawbone Aging, and Cementum Annuli
By: Eric Michel
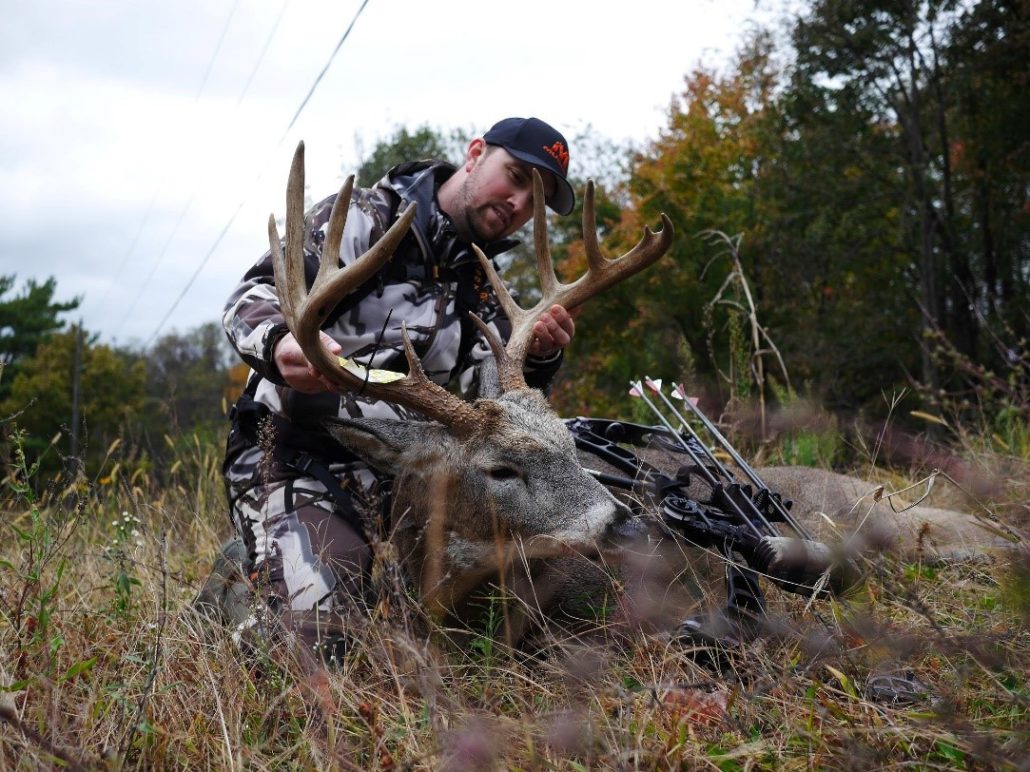
If you’ve been around deer hunting for any amount of time you probably understand that many hunters get caught up in trying to age deer, and for good reason. Aging deer, whether dead or alive, can give you valuable information about what you can do to better manage your herd and reach your goals. Many hunters would like to consistently harvest bucks of a certain antler size, but often times fall short. Allowing those bucks to live for a year or two more would likely help those hunters accomplish their goals, but they won’t know that if they aren’t aging their deer.
There are several ways to age deer, but it’s important to understand that none of them are 100% accurate and accuracy usually decreases as deer get older. Each method also has a certain level of subjectivity associated with it. The only way to know for certain how old a deer is, is to give it some type of unique identifier at birth. Outside of that, you can rarely say with 100% accuracy that a deer is a certain age, but you can say that a deer is displaying characteristics associated with a certain age. Even though people will use the number of antler points and antler configuration to keep track of a deer throughout the years, they are still making assumptions about how old the deer is the first time they see it. Even if you think the deer is most likely a yearling when you first see it, there’s only about a 30% chance that buck will be on your property the next year. This is because about 70% of yearlings will disperse up to five miles away from where they are born. Additionally, the number of points and a bucks antler configuration can change from year-to-year depending on disease, quality of nutrition, and antler injuries. This article discusses the three most common methods to age deer.
Cementum Annuli
Most people have probably heard about how you can use growth rings to age a tree. Well the same concept can be applied to white-tailed deer. A calcified layer of cementum is laid down each year a deer is alive which allows you to take a cross-section of the tooth and count the number of rings associated with it. This method is done by removing one of the front incisors from a dead deer and sending it off to a lab so the age can be estimated. Generally speaking, the lab will charge you a minimum cost (usually around 75$) so it’s best to wait to send in all of the incisors you’ve collected until after the hunting season.
Counting cementum annuli is considered to be the most accurate method of estimating age, though it’s not perfect and there is little, if any, research that has compared ages derived from counting cementum annuli to those of known-aged deer. This method can also be cost prohibitive for individuals who harvest a large number of deer from their property or even state agencies who collect samples from sometimes hundreds of deer.
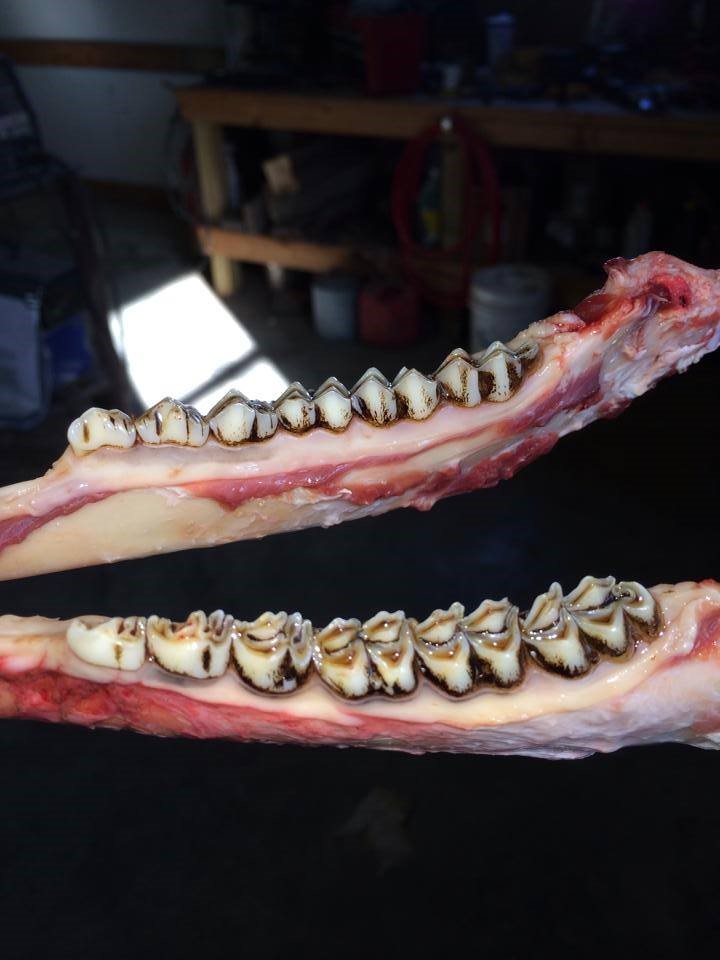
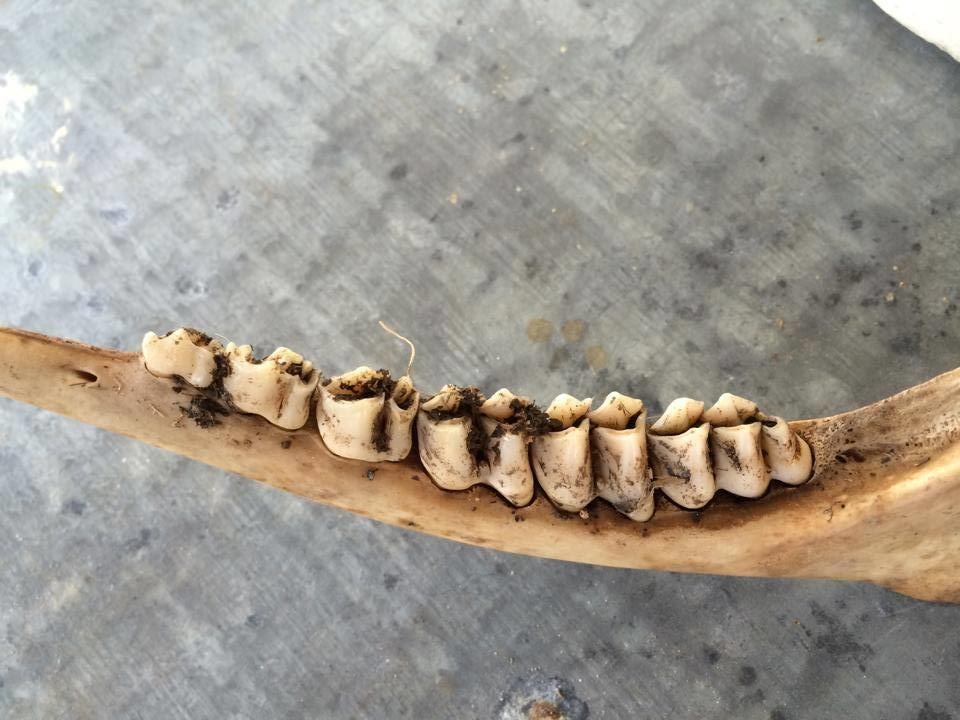
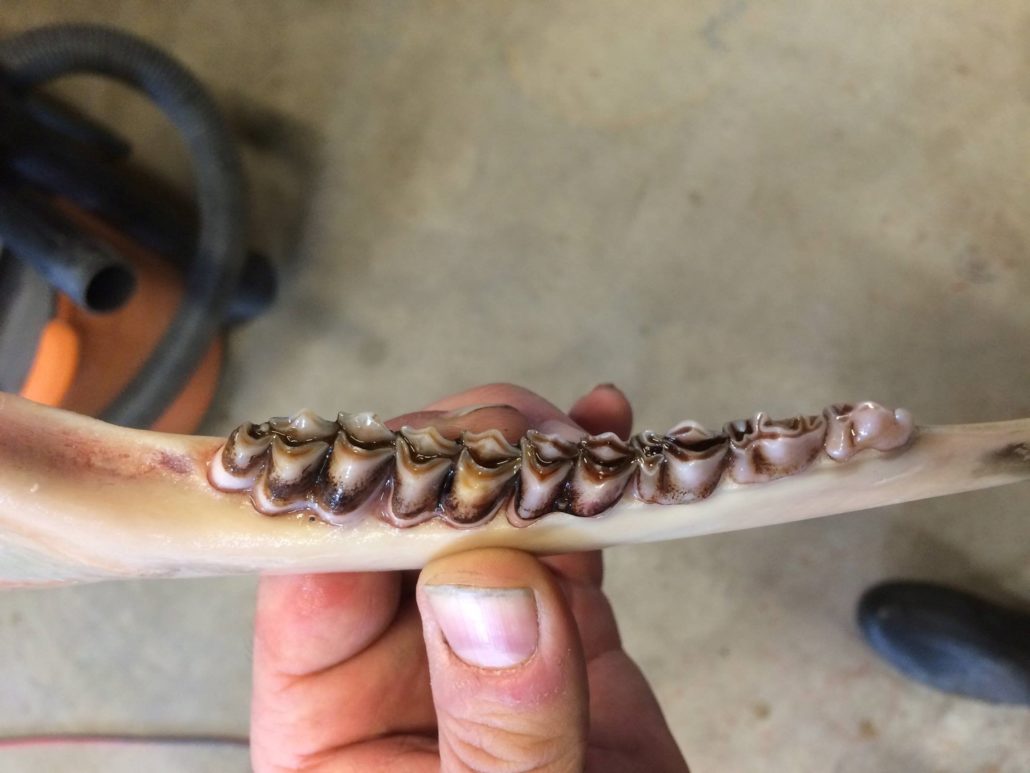
Tooth Replacement and Wear
Tooth replacement and wear is the oldest method used to age deer. This method is great for several reasons. First, it’s cheap. You can do this method by yourself without having to send the jawbone off for analysis. It is also fast after you know what you’re looking for. The biggest downfall of this method is its inaccuracy and subjectivity. There are several factors that can impact the wear rates for a deer’s tooth (individual variation associated with the deer, diet, sand content in the soil, etc.). This can cause an individual deer or even a population of deer to have different wear patterns compared to other individuals or populations. Additionally, when assessing the wear, the difference between a 2.5- and 3.5-year-old deer can be minimal and two people may have differences in opinion when looking at the same jawbone. On a positive note, this method is great for placing deer into one of three age classes: fawns, 1.5-year-olds (yearlings), or 2.5+. The downside is this may not be detailed enough to help you achieve your management goals.
So how do you use this method to age deer? This method revolves around identifying which teeth have been replaced and then understanding the subsequent wear patterns. The replacement portion of the method is almost 100% accurate while the wear portion of the method has decreasing accuracy as a deer ages because you are comparing the ratio of dentine (dark part of the tooth) to the enamel (white part of the tooth) on the lingual crest which is the crest adjacent to the deer’s tongue.
Fawns
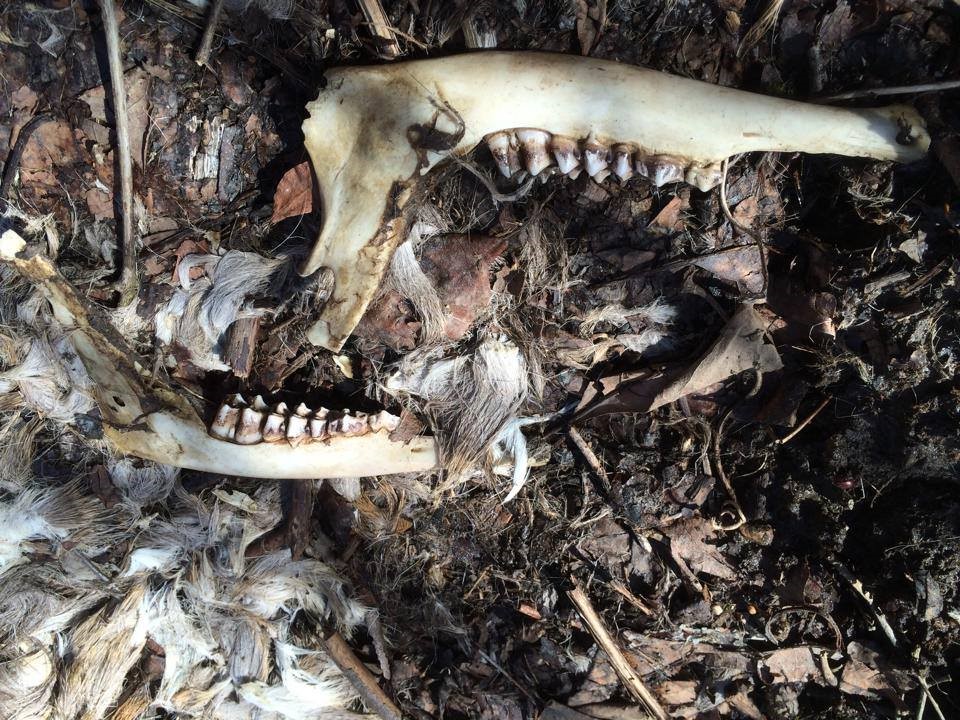
Aging fawns is easy because they don’t have all of their teeth yet. An adult white-tailed deer will have six teeth on their lower jaw. If you harvest a deer and it has less than six fully erupted teeth and the third premolar is a tricuspid (three cusps), then it is considered to be a fawn.
Yearlings
You can age yearlings with almost 100% accuracy because you are still using tooth replacement as your guide. Remember, the first thing you do when aging a jawbone is count the number of teeth on the lower jawbone. If there are six teeth, the next thing you do is look at the number of cusps on the premolar or third tooth in from the front. If this is tooth is a tricuspid, then it is a yearling or 1.5-year-old deer. This is easy to identify, but it gets more complicated depending on the exact age of the deer. If your state allows for an elongated hunting season, deer may have already replaced their tricuspid tooth. If so, the new bicuspid that has replaced it will be much whiter than the surrounding teeth with very little wear.
2.5-year-olds
You can still use the replacement portion of this method to classify deer as at least 2.5-years-old. This is pretty easy to do. First, you make sure there are at least six teeth. Next you check the third premolar to see whether it is a tricuspid or a bicuspid. If it’s a bicuspid, and the first three teeth display some staining and wearing, then you can classify the animal as at least 2.5-years-old. However, if the third tooth is a bicuspid and the first three teeth are completely white with no wear or staining, then the deer is still likely a 1.5-year-old.
3.5+ year-olds
Aging deer as 3.5-year-olds or older means you now have to use the tooth wear portion of the method. For this, you start on the first molar (the fourth tooth in from the front) because this is the oldest tooth in the jaw. The concept of tooth wear is pretty simple. Looking at the tall portion of the crests, you simply compare the width of the dentine to the width of the enamel. If the dentine is at least twice as wide as the enamel, then the deer can be labeled as a 3.5-year-old. If the dentine is not twice as wide, then the deer is likely a 2.5-year-old. You use this same comparison of dentine to enamel to age a deer to 5.5+. So for example, if the dentine on the fourth tooth is twice as wide as the enamel, then the deer is at least 3.5-years-old so you move to the next molar. If the dentine on that tooth is not twice as wide as the enamel, then you stick with the age of 3.5, but if the dentine is twice as wide on the enamel of the fifth molar, then the deer is likely 4.5-years-old. You then apply this same concept to determine if the animal is 4.5- or 5.5-years of age. If the dentine is at least twice as wide as the enamel on the 6th molar, then the deer is at least 5.5-years-old, but if it isn’t then the deer is probably only 4.5-years-old. Accuracy dramatically declines with the increasing age of an animal and aging to 5.5-years is adequate for most management schemes so it’s best to stop and aging at 5.5-years.
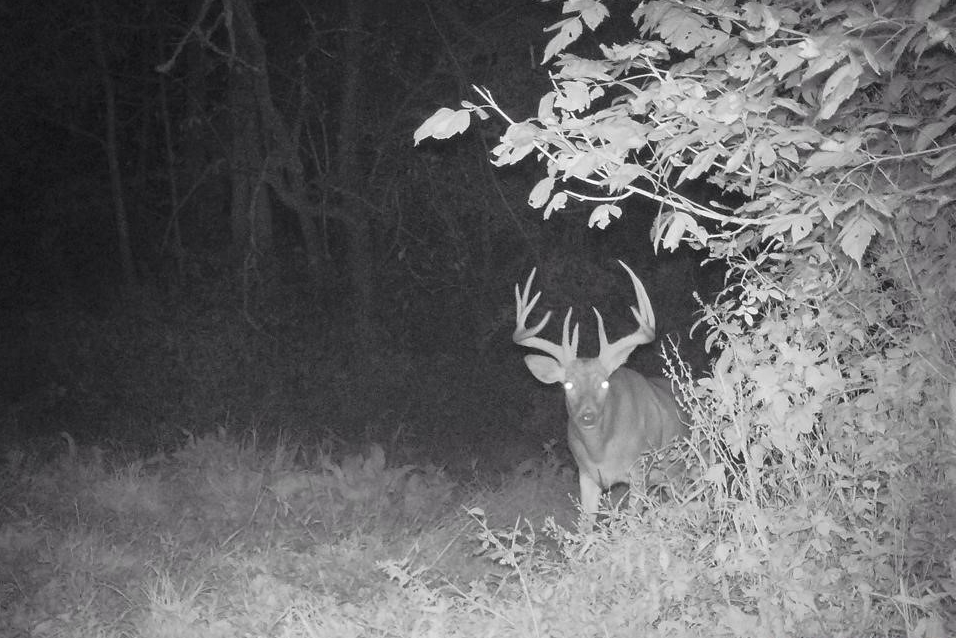
Aging Deer on the Hoof
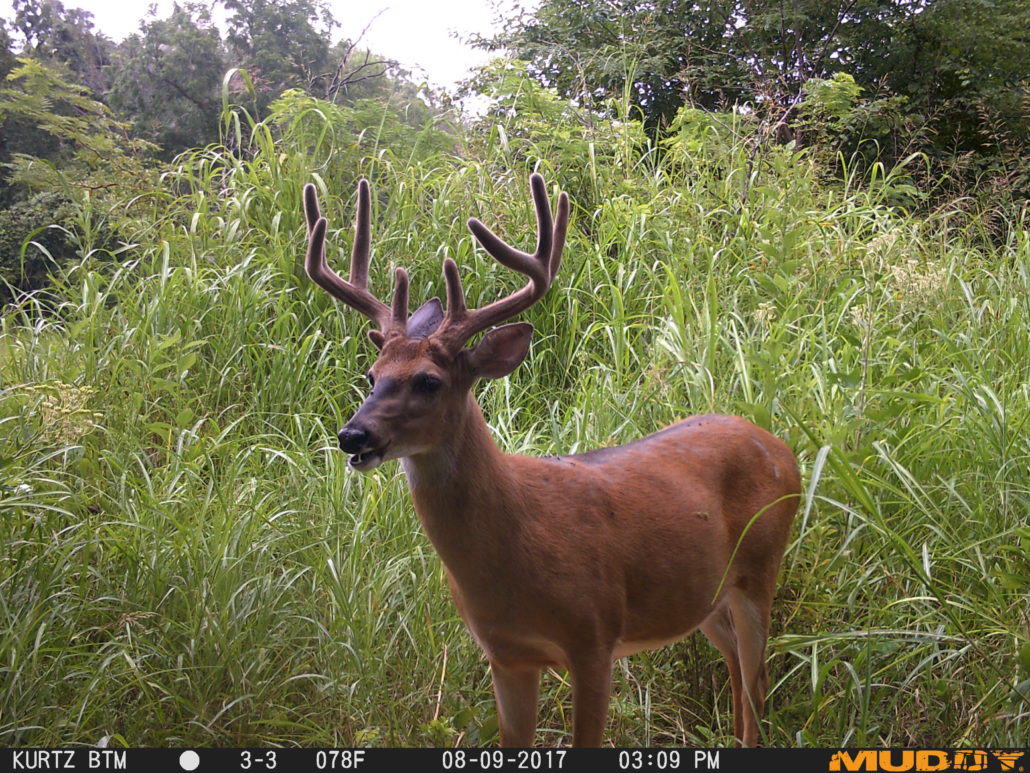
Aging deer on the hoof is one of the most used methods by both hunters and biologists. You don’t have to watch any hunting show long and you will inevitably hear somebody say something along the lines of “look at this 2.5-year old, he sure is an up and comer”. Everybody likes to think that they can accurately age on the hoof and there are several benefits to being able to accurately age a buck on the hoof. Mainly, because it is the only way you can assess the age of a buck while it’s still alive which should ultimately help you reach your management goals. Aging a buck on the hoof takes a lot of experience of looking at pictures and even with that, it is the least accurate method. A study that polled state deer biologists and university researchers showed that when given a series of pictures of bucks, only 62% of them accurately aged yearlings, only 43% accurately aged 2.5-year-olds, 25% for 3.5-year-olds, and less than 30% accurately aged 4.5-, 5.5-, 6.5-, and 7.5+ year-old bucks. But despite being an inaccurate method of aging, it is still widely used. Here are some characteristics you can use to help you decide how old that buck is before you pull the trigger.
Fawns
Aging fawns on the hoof is pretty easy but also very important. For example, if you are trying to fill your doe tag during a late season hunt, you don’t want to mistake a buck fawn for a yearling doe. It’s much easier to identify fawns when they are in a group with adults because they will generally be the smallest of the bunch. You can also look at the shape of their head. Fawns obviously have smaller heads and will tend to look like a soda bottle, short and stubby.
Yearlings
Yearling bucks should be one of the easiest deer to estimate age for, but again, only 62% of professionals were able to accurately place bucks into this age class. There are several things to look for that will help you when aging yearling deer. Primarily, you should be looking for underdeveloped muscles in the buck’s front and hindquarters. They will also have pencil thin necks and their stomachs will run at an upward slant from their front quarters to hindquarters. Another characteristic to look for is how long their legs look. Younger deer tend to have legs that look disproportionately long because they haven’t filled out yet in their quarters and stomach regions. Probably the most tell-tale sign that a buck is only 1.5-years-old is if it looks like a doe after covering up it’s antlers. If this is the case, then you most likely are dealing with a yearling buck.
2.5-year-olds
Bucks that are 2.5-years-old can be difficult to tell from 1.5-year-old bucks. Generally speaking, their legs still look long for their body, though they will have front and hind quarters that will be more filled out than a yearlings. A 2.5-year-olds neck will also begin to be more filled out than a yearlings during the rut.
3.5-year-olds
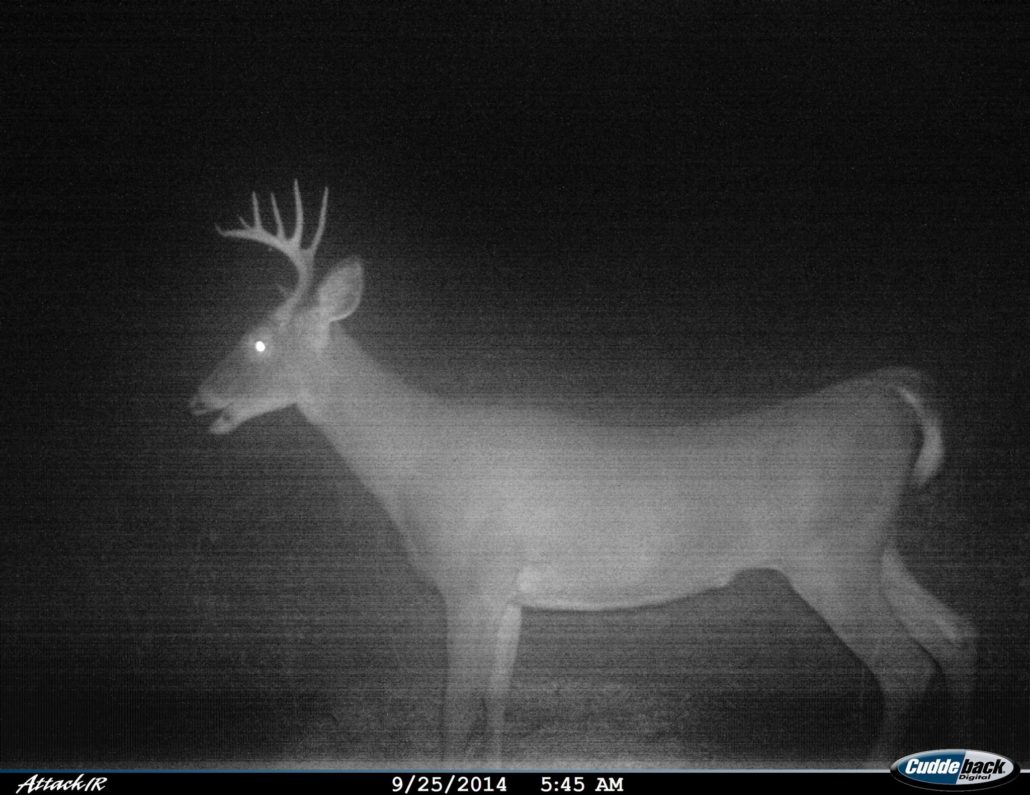
Being able to identify a buck as 3.5-years-old can be one of the most important things you can do for your management plan. This is because 3.5-year-olds have only reached about 75% of their maximum antler size. That remaining 25% can be the difference between a 130-inch buck at 3.5 and a 160-inch buck at 5.5. Unfortunately, the 3.5-year age class is one of the most difficult to accurately age.
By 3.5-years, bucks will start to have more swelling in their necks during the rut with their neck flowing more into their brisket. Their legs will start to look more proportional to their body and they will have a sleek, muscular look to them though their front and hindquarters won’t be fully developed. They will also start to develop moderate tarsal staining.
4.5-year-olds
By 4.5-years, a buck will start to develop the sleek racehorse look. They will have fully developed front and hindquarters but will look more muscular than anything. Their necks will begin to look very swollen during the rut and their stomach will be flat from front to hindquarters. They will also display an increased amount of staining on the tarsal gland.
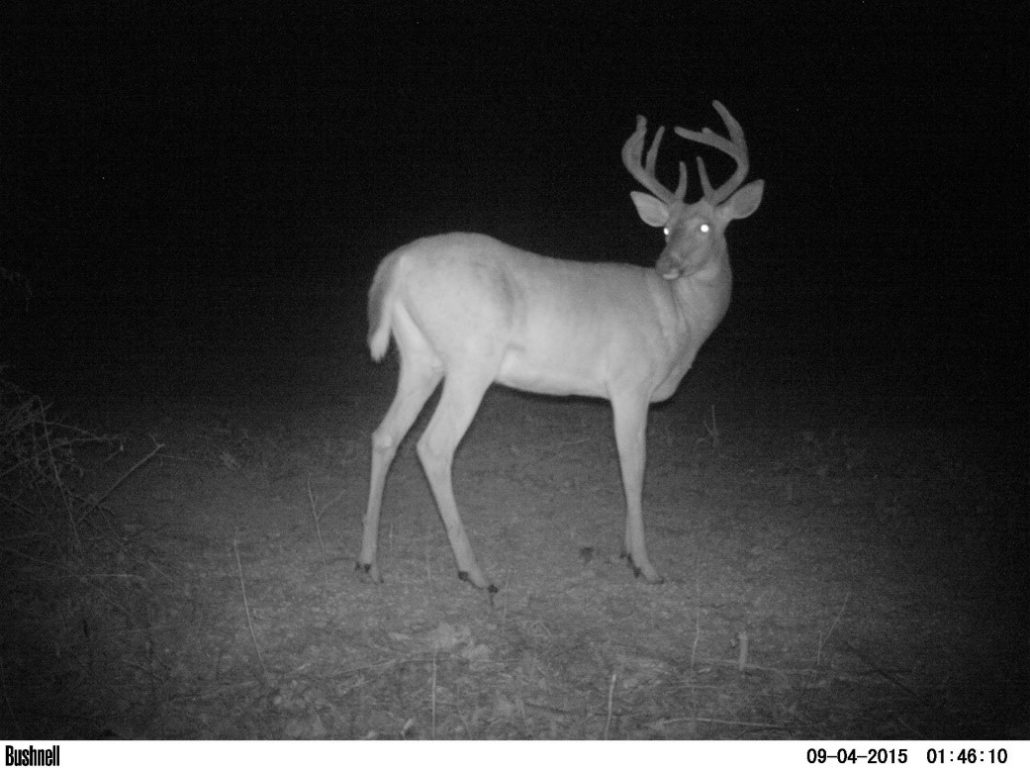
5.5+
Once a deer has reached the age of 5.5-years they are generally considered to be fully mature. These deer will have fully developed front and hindquarters but they will no longer look as muscular as they did at 4.5. Bucks that are 5.5+ tend to have a sagging belly and a swale in their back. Their necks will flow right into their brisket and will look quite large after swelling during the rut. A fully mature bucks legs will also tend to look short relative to their body because their body is now fully developed.
Regardless of whether you are looking to age deer on the hoof to help determine which bucks you will harvest this fall, or are trying to collect harvest data to monitor your management program, age data can be invaluable. Keep these methods in mind this fall when trying to age your deer.
https://www.buckscore.com/wp-content/uploads/2018/10/agining-deer-101_feature-Copy.jpg15362048BuckScorehttps://www.buckscore.com/wp-content/uploads/2024/09/buckscore-logo.pngBuckScore2018-10-29 16:36:262019-08-28 12:20:11How to Age White-tailed Deer | Three Methods You Can Use This Deer Season
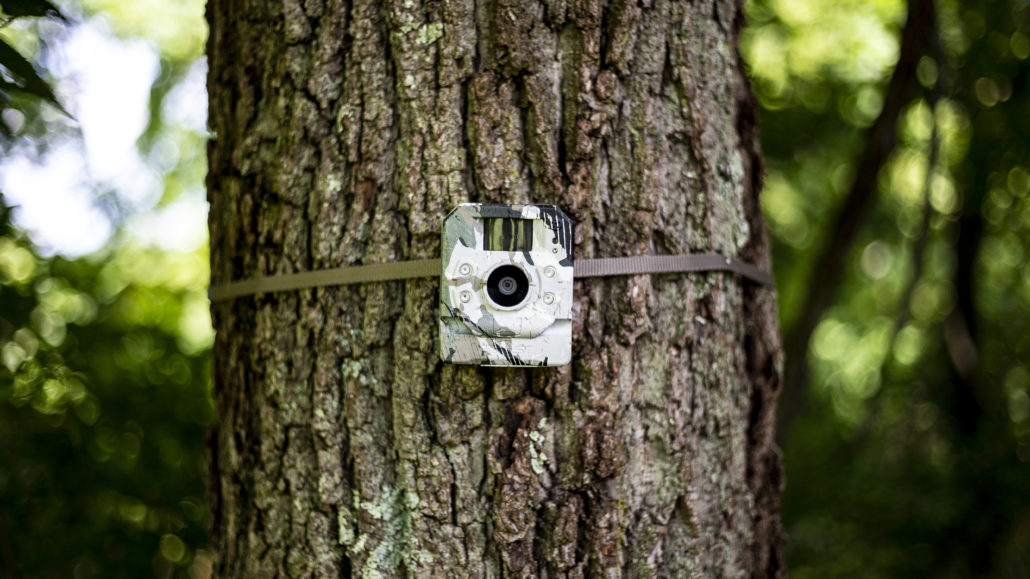
Trail cameras have been the sportsman’s favorite scouting tool for decades. What was once only a blurry snapshot of a deer running off, has turned into a highly detailed image that is packed full of valuable scouting data. Everything a hunter could need is right at their fingertips.
Cameras have also become incredibly convenient. Before, having a trail camera meant running to grab the camera and then proceeding to run to the print shop to have the film developed. For some individuals, this was a process that took hours, if not days, depending on the convenience of the location. However nowadays, images are viewable on the spot. Not only are they clear and detailed, but they are packed full of data. In fact, cameras can go as far as telling you exactly how big the deer you are going to shoot is, before you even hunt it.
As with all technology, trail cameras are now better than ever. They are more compact, have higher quality photos, are more discrete, and give out such a significant amount of information that most people don’t even know what to do with it all.
However, getting the most out of a trail camera requires more than just buying the latest and greatest. Instead, it takes careful planning, knowledge, and a management strategy. That’s why we have put together a list of tips that will help improve your trail camera game.
Pick a Quality Camera (not just the fanciest one)
This one is pretty obvious. There can’t be quality trail camera photos without a quality camera. Using an outdated or poorly designed unit means not only disturbing deer, but also getting disproportioned and low quality images. Not being able to see the image makes it difficult to analyze the image and its data.
Therefore, one of the most important aspects of a productive scouting plan is having a camera that can take high enough quality images. Unfortunately, this is much more complicated than most people think. For starters, a high number of megapixels does not indicate a high quality camera. In fact, manufactures even inflate megapixels to help inflate sales. Therefore, it’s wise to look at more than just the megapixel count. Instead, look at its capabilities and if those capabilities will fit your individual situation.
For example, find out and compare the following features between cameras before making a purchase:
Motion detection range
Flash capabilities
Type of flash
Recovery time
Number of “true” megapixels
Number of lenses
Age of camera
Mode options (time lapse, video, etc..)
If your camera doesn’t have a fast recovery time; you’ll likely miss seeing critical angles, or even multiple deer in a photo. If your camera doesn’t have high quality flash, you risk spooking the deer or missing valuable night images. All of these have big impacts on your scouting plan.
Some people get lost comparing and understanding technical features; however, something everyone can do is read reviews, watch reviews, and even try a little trial and error of their own before committing to a purchase.
Ways to do this include:
Looking at real life example photos on social media,
Watching YouTube reviews
Reading reviews across the internet
Trying a friend’s camera out
Test running a camera in store before making that purchase
Remember not all trail cameras are created equal. Therefore, even when hunters aren’t familiar with a camera’s specifications, they can still look at real work examples to help them make a better purchase.
Find the Right Location and Don’t Be Afraid to Move
Location is everything. From macro-environment to the micro-environment, having the right location tends to be the one of the most critical factors in success. Whether you are talking about which parcel of land you want to focus your attention to the food plot you will decide to hunt over, success is highly dependent on each location and its ability at the time to support quality deer. When that field no longer has corn? It’s time to move locations.
Therefore, whether you hunt land in different locations, or during different times of the year, it’s important that you keep an open mind and move your camera when necessary. If you aren’t seeing deer that you think should be there, then move. You wouldn’t hunt the same spot without seeing deer; therefore, don’t scout the same spot – no matter how convincing the environment might look.
Perhaps you pushed too much scent through the area causing deer to re-route your area. Maybe the food source was harvested, water dried up, or hunting pressure changed the deer’s pattern. Then it’s time to move.
How to Find the Right Locations
When deciding on the right location before and after a trail camera move, there are some critical aspects to consider. These can include:
The Conditions of the Land
Is it woodland, prairie, or cropland? Understanding the landscape is important in understanding which areas you should monitor.
The Time of Year
As mentioned, deer patterns and actions change throughout the course of a year. In fact, the food plot you were monitoring in September might not be the best place to set up your camera during the rut. Instead, you might choose to setup over a scrape, or a funnel. As the season’s change, so should your scouting plan.
Number of Trail Cameras You Have at Your Disposal
If you could only afford one camera in your budget, make it count. Use it to help you find proper stand placement based on deer size, time of day, and routine.
If you use multiple cameras you can monitor the entire area, multiple deer patterns, and even find your buck’s core areas.
Ability to Move
If possible, move throughout the season. This helps reduce scent in a particular area and reduce pressure on the deer.
We have an in depth article discussing the best trail camera locations that you can read in full here.
Know Your Settings and What They Do For You
Setting up your trail camera means adjusting its settings to fit you and your situation. Just like with our cell phones and computers, sometimes it is easier to set it and forget it then to actually learn why these settings are there or what they can do for you.
Our tip is to have a list of tasks you should do before implementing any camera.
When you get your camera, first make sure you insert the right size SD card and the proper batteries. If you are checking your camera, be sure to check the batteries and camera storage. If you don’t plan on returning to this area for a significant amount of time, the bigger the card, the better.
Next, check for software updates. This is crucial to assure your camera is operating smoothly and at its highest capability.
Then you need to adjust the settings for your particular goal. Trail cameras come with many different modes and settings. For example, you can pick time lapse mode to catch the changing environment from afar. You can also adjust motion detection and response time to capture a select amount of images when movement appears. Perhaps video mode will be better for deer analysis and scoring.
In general, be sure to adjust the following settings:
Mode (video, timelapse, etc…)
Trigger speed
Flash settings
Frequency
Test these features. After finding the proper location and placement, be sure to test these settings before leaving the area. Nothing is worse than leaving the camera for a few weeks only to return and find that your photos aren’t angled appropriately, or you happen to have no photos at all.
Reconsider Your Placement
Knowing where to place your camera, means knowing your goals. Sometimes hunters seem to think it’s a “one size fits all approach”. However, that couldn’t be farther from the truth. There are many different angles and scenarios you can use your camera in.
For example, are you looking over a field and want to monitor the number of deer, environment, or other factors? Or do you hope to place it over a salt lick to catch that close up photo?
Knowing which one is right for you depends on a number of factors:
Do you want an aerial view of your food plot or a close up shot of that buck?
Do you have multiple cameras to catch multiple angles (close vs aerial)?
Do you want to score that deer? You will need a clear and close image, or video.
Is motion detection important or will you be using time lapse mode?
Is the camera the perfect distance from the target?
Go through each one of these before choosing, and especially leaving, a spot. Keep an open mind. Perhaps monitoring the environment while you monitor your deer size can help you put together a better scouting plan. Maybe video will suit your needs better. Don’t be afraid to learn the settings, find the right locations, and then change up your placement.
You can find a more detailed guide on properly setting up your trail camera here.
Photo Management
One of the most overlooked features of any trail camera strategy is organization. In fact, photo management can revolutionize a scouting routine. For example, being able to pattern deer means having a traceable record of deer size, timing, and camera placement. You cannot rely on your own memory for this. You need an organized database where you can literally map trends, track conditions, and even analyze deer size.
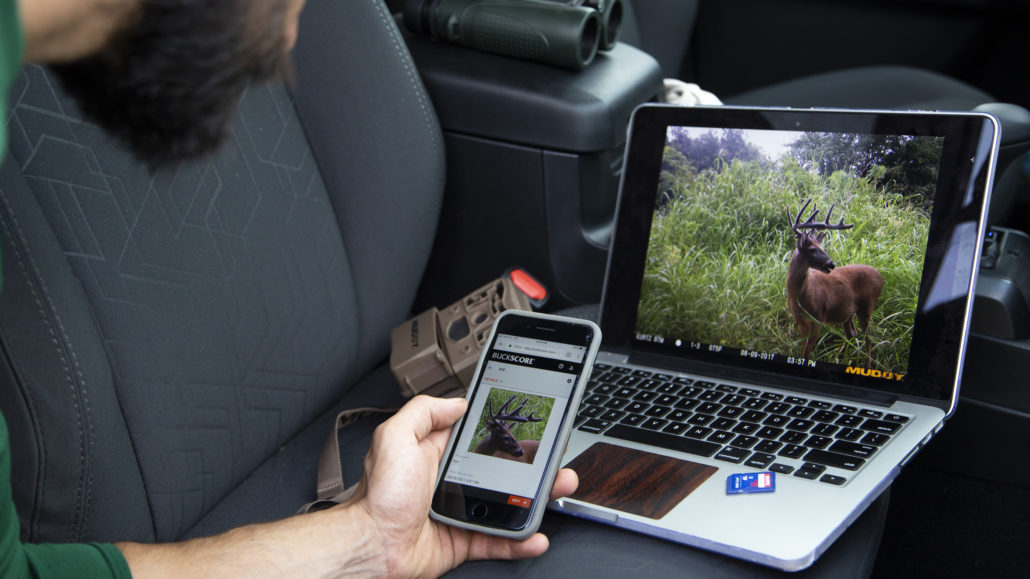
Photo management software is a must for properly organizing and analyzing this data. However, not all photo management software is the same. Despite there being plenty of options available, there is only one that is developed by researchers to accurately estimate your deer’s size: BuckScore.
BuckScore
One of the best tools for organizing and analyzing trail camera photos is BuckScore. Instead of traditional tools that simply organize photos based on environmental conditions and/or time, BuckScore can help you organize buck based on its size. This is incredibly important when determining which bucks to target and which ones to let walk. It also helps alleviate wasteful data and photos that clutter your computer and don’t let you reach your end goal: shooting that trophy deer. It’s also incredible exciting to know if that buck you’ve been tracking can join the Pope and Young club.
Take Your Trail Camera More Seriously This Year
Many people simply set it and forget it when it comes to trail cameras. They add the batteries, insert the SD card and set it out for use. However they are missing out on the cameras most advanced and beneficial features. A few adjustments can go a long way in trail camera value.
For example, if you don’t plan on leaving your camera out for a significant amount of time; you might benefit more from video mode then from capturing stills. Additionally, if you plan on leaving your camera unattended for a few months, it’s in your advantage to not use video or time lapse to save space.
By better managing your data, taking time to find the best spots, and doing your research before you invest; you cannot only improve the quality of your trail camera information, but also improve the success rate of your hunt this fall.
https://www.buckscore.com/wp-content/uploads/2018/12/BuckScore_FeatureImage-scaled.jpg14402560BuckScorehttps://www.buckscore.com/wp-content/uploads/2024/09/buckscore-logo.pngBuckScore2018-10-18 19:50:122019-08-28 12:20:11Best Trail Camera Tips for Deer Season
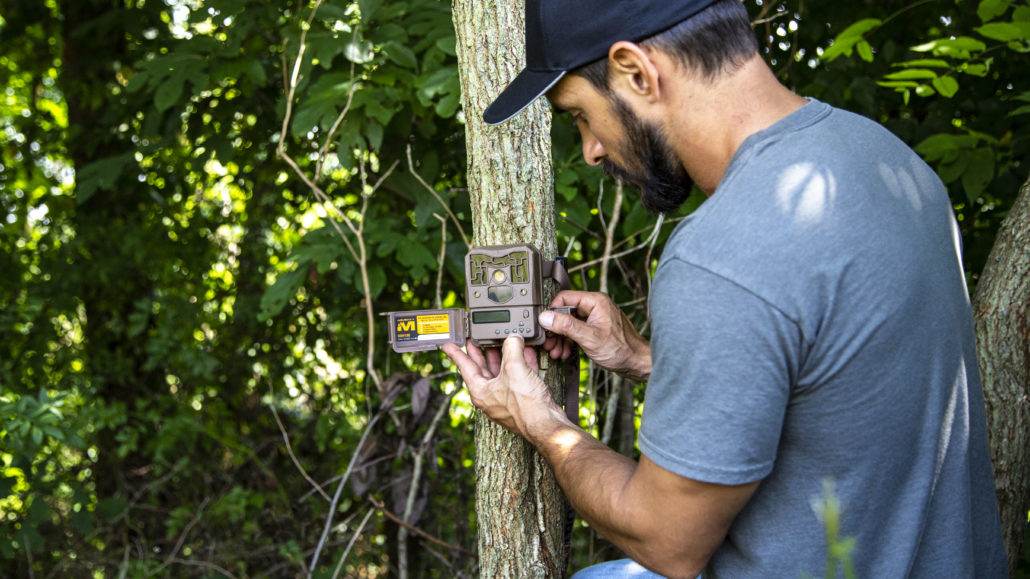
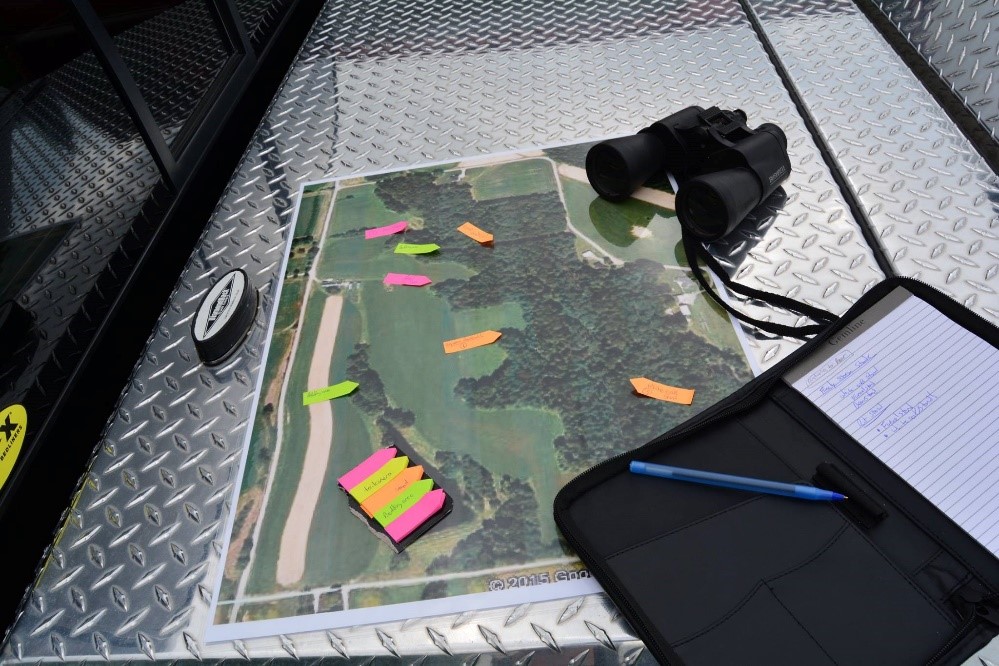
Trail cameras are arguably one of the best tools you have as a deer hunter to help increase your chances of harvesting a buck in the fall. Hunters are able to develop things like their hit list of bucks they would like to harvest if given the opportunity during the hunting season and can glean the most recent information about deer movement to help guide which stand to hunt. Although using trail cameras can be useful, how do you know how many to use or where to put them on your hunting property? This article will give you some tips on where to set up your cameras and how many cameras you may need to be effective in your scouting.
Identifying Buck Movements
Every hunting property is a little bit different. Some properties may have plenty of bedding areas but lack food sources and others may have just the opposite. Using cameras is one of the more effective ways to identify how individual bucks are using your property. This generally begins sometime in mid to late summer when you can start to identify bucks based off their antler development. Place your cameras in known feeding areas to inventory which bucks are hitting which food sources. Once you have a buck identified and know which food source they are consistently visiting, you can then begin to identify travel corridors and potential bedding areas. Hopefully you have already had a chance to scout the property to identify travel corridors and bedding areas, but if you haven’t you can begin with an aerial map to help you narrow down these locations. Once you have identified those areas on the map, you can more precisely go in to scout. Using multiple cameras on multiple food sources will also help paint a picture for you regarding deer movement on your hunting property. For example, if you get a picture of a buck in your food plot planted with soybeans at 7:30 p.m. and then another photo of the same buck in your white clover plot 6 hours later, you likely can start to put together that buck is taking it’s time moving between plots. That may mean there is a bedding area in between them or there are certain features in the landscape that the buck may be more likely to use when traveling. This type of scouting if done well before hunting season or even year-round can dramatically improve your chances of harvesting a buck by simply knowing how deer in general, or a buck in particular, is moving across your hunting property.
Inventorying Bucks on Your Hunting Property
One of the more entertaining things hunters generally look forward to each year is creating a hit list of bucks they may be interested in harvesting in the upcoming hunting season. Trail cameras can obviously aid in this process, but how many cameras do you need and where should you place them to accurately inventory the bucks using your property? Research has shown that when conducting a trail camera survey to estimate things like deer density, recruitment, and adult sex ratios, you will need one camera per 100-acres of land with larger properties generally yielding more accurate estimates. This is a good rule of thumb to follow, but what if you only hunt 200-acres and are most concerned with simply inventorying the bucks using your property? If this is your situation, then placing a camera on each major food source, whether that be a summer food plot, an agricultural field, or even a supplemental mineral site, will allow you the best chance of identifying a majority of the bucks using your property. If you are limited on the number of cameras you have, make best use of them by placing them on high-traffic food sources. In other words, use some on the ground scouting to identify heavily used trails coming into or leaving a food source. This will help maximize your efficiency. If you check your cameras and find that you don’t have many pictures, then don’t be afraid to move the camera. Placing cameras in major food sources means you can check them without causing a major disturbance. Drive right up to the camera if you can. This will help decrease the impact you have on the area and will allow you to move the camera if you think you may have a better area.
Gaining the Most Recent Information (MRI)
Being mobile during the hunting season can be one of the best ways to increase your chances of harvesting a buck. But how do you know when it’s time to move to another stand or move your set-up all together? Having the most recent information, or MRI, on hand will help you in making this decision. There are several ways to gain information during the hunting season. You may simply see deer consistently using a trail just out of range and need to move your set-up to capitalize on that movement. But what about the movement around other stands you aren’t using? You guessed it! Trail cameras can help in this arena as well. Using cameras at stand sites can be tricky given you will want to minimize disturbance when checking them. Waiting for the perfect stand conditions to hunt that particular stand and then switching out SD cards when you are walking into or leaving the area will help minimize the disturbance you are causing. You can also try using cameras that use cell phone connection to remotely send you pictures of what’s going on. This will completely eliminate any disturbance from an area while still allowing you to obtain the MRI. Deciding on how many cameras you need to have out during the hunting season is also a bit trickier than when you’re inventorying what bucks are using your property. Try to identify which stands will be your best stands during the season. This may change throughout the fall as bucks transition from using food sources more during early and late seasons to checking bedding areas during the rut; though, bucks will also still scent check food plots during the rut so it’s always a good idea to have a stand on a food source that does will use throughout the fall. Again, you want to be careful and minimize your disturbance when checking cameras during the hunting season, so wait on ideal conditions to hunt a stand and check your cameras then to see what’s going on and don’t be afraid to move if the cameras are showing heavy action in a different area.
The old adage, “a picture is worth a thousand words” couldn’t be more accurate when using trail cameras for scouting. Using them year-round will help you identify everything from how deer are using your hunting property to which hit list bucks are around in the fall. Try using some of these tips the next time you’re scouting your hunting property and they just might help you close the deal during hunting season.
https://www.buckscore.com/wp-content/uploads/2018/12/BuckScore_TrailCameraTips_FeatureImage.jpg11522048BuckScorehttps://www.buckscore.com/wp-content/uploads/2024/09/buckscore-logo.pngBuckScore2018-10-17 17:39:012018-12-17 17:51:21Trail Camera Tips for the Hunting Season and Beyond
Trail Camera Tips for Attracting Deer without Bait
By: Eric Michel, Wildlife Biologist
Chronic wasting disease; three words that no deer hunter wants to hear. Yet, more and more deer hunters are dealing with this disease as it continues to spread across the whitetails range. Chronic wasting disease or, CWD, is at the top of the list of concerns for many state wildlife biologists. Why? It’s an always fatal infectious brain disease caused by a prion (misshaped protein) that currently has no cure. Unlike other diseases such as epizootic hemorrhagic disease (EHD), deer do not build up an immunity to CWD and once CWD is found in a herd, it’s there to stay as it spreads among the population through urine, feces and saliva of infected individuals. What’s even more concerning is that CWD is in the same family as mad cow disease and although there hasn’t been any documented cases of CWD leaping the species barrier and infecting humans, agencies such as the World Health Organization and the Centers of Disease Control do not recommend eating meat from CWD infected animals.
Once CWD is found in an area, deer management tends to dramatically change. Everything from harvest regulations to baiting regulations are up for debate and rightfully so. Recent research out of the University of Wisconsin – Madison showed that areas where minerals are placed to help supplement a herd’s nutrition actually serve as a reservoir for the prions that cause CWD and deer can become infected from using these mineral sites. This is bad news for hunters who like to place supplemental minerals or other attractants on their properties to increase the number of pictures they can get with trail cameras. Using some type of attractant with your trail camera can dramatically increase the quantity and quality of photos you are able to get which translates into things like deriving a hit list for the fall or obtaining information like population estimates to help you better understand how many bucks and does you should harvest. So what can you do if you no longer want to use attractants or the use of attractants is now illegal because of the presence of CWD in your area?
Trail Camera Tips and Tactics Without Deer Bait and Minerals
This article will discuss other, more “natural” attractants you can use that will allow you to still get high-quality photos.
Mineral Stumps
Mineral stumps have taken the deer world by force since they were first mentioned by members of the Mississippi State University Deer Lab last year.
Provide minerals to deer the way Mother Nature intended – thru vegetation. Create "Mineral Stumps" to increase deer nutrition and hunting opportunities. Please watch the video and tune into the next episode of Deer University to learn more.https://traffic.libsyn.com/deeruniversity/Episode_007_-_Mineral_Stumps_for_Deer_Nutrition.mp3College of Forest Resources, Mississippi State University Mississippi State University Extension Service Mississippi State University Foundation Mississippi Department of Wildlife, Fisheries, and Parks Wired To Hunt National Deer Alliance The Quality Deer Management Association White Knuckle Productions WebShow & Podcast The Management Advantage Mossy Oak GameKeepers STIHL Husqvarna
Essentially, mineral stumps occur when harvested trees produce sprouts from their stumps. These sprouts are highly nutritious because the root system is so much larger than the sprouts that they contain increased minerals. Deer tend to flock to mineral stumps and placing a camera on these stumps can produce high-quality photos. So how are mineral stumps different than supplemental mineral that’s placed on the ground? Deer aren’t as likely to consume dirt like they would if they were using attractants that are placed directly on the ground. This is important because prions are directly deposited into the dirt by other deer using the site, which can lead to infecting multiple deer. Additionally, once the leaves are gone from a mineral stump, deer use will dramatically decrease. Other attractants tend to leach into the soil meaning deer will continue to visit those sites long after the attractant is gone.
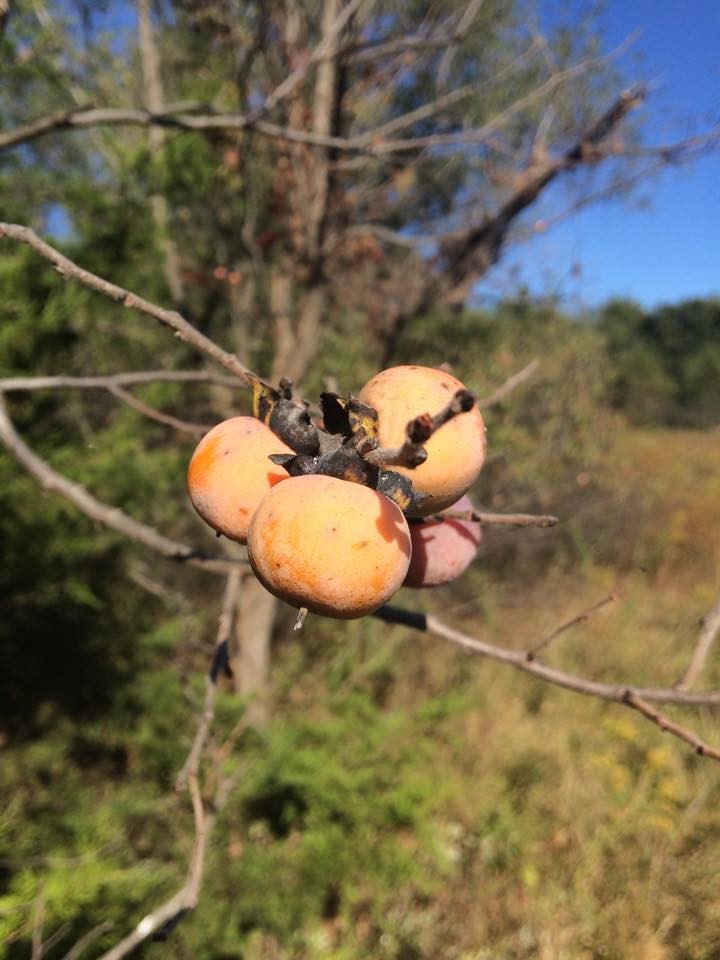
Mast Trees
Setting up trail cameras on trees that produce hard or soft mast is another great way to get photos of those bucks you’ll be hunting in the fall. Deer will disproportionately feed in areas that are producing and dropping apples, acorns, or persimmons. This is because mast represents a limited resource that isn’t available throughout the year. Acorns are particularly high in fat content which can be crucial to helping deer increase their body fat in preparation for the rut. Even the most mature, nocturnal bucks will eventually hit these food sources before they run out.
Food Plots
Food plots may seem like an obvious choice to place a camera to get pictures. There are a couple of things to keep in mind though when picking a specific food plot and a location within that plot to place your camera. First, think about the size of the plot. Larger food plots can be difficult to capture photos from because deer may have several access points, in turn, decreasing your ability to concentrate deer and get photos of most of the deer using the plot. Obviously, one way to curb this issue is to place your camera on what seems to be the main trail being used by deer or simply use multiple cameras. Another way to increase your ability to concentrate deer into a food plot is to consider the size of the plot itself. Putting a camera in a small “honey-hole” sized plot (usually less than an acre) will increase your ability to cover the entire plot with one or two cameras while still getting quality photos because deer shouldn’t be too far away from your camera.
Mock Scrapes
Using mock scrapes can be an extremely effective method to use to get pictures of bucks but there has been some recent controversy with the type of deer urine that you might use in a mock scrape. Several states have banned the use of natural urine because of the potential of it containing CWD prions. Because of this, it is best to use synthetic deer lures just to reduce all potential risk. Additionally, deer urinate at scrape sites, which may potentially infect the site if the deer has CWD, though there is no specific research that shows this. Regardless, using synthetic deer lures to create mock scrapes can be a great way for you to inventory what bucks are using your hunting property.
Although all of these more natural methods will undoubtedly help you get pictures of your hit list bucks, research is still needed to address whether these methods are good enough to use when running a trail camera survey or study to estimate things like population size, buck to doe ratios, and fawn recruitment into the population. Regardless, you should give these alternative methods a try if you have CWD in your area or are simply concerned about the potential spread of CWD. You may be surprised at just how well they work!
https://www.buckscore.com/wp-content/uploads/2018/09/CWD-Baiting-bans-trail-camera-tips_Feature.jpg13161907BuckScorehttps://www.buckscore.com/wp-content/uploads/2024/09/buckscore-logo.pngBuckScore2018-09-12 18:03:032018-09-12 19:17:06CWD Baiting Bans | Attracting Deer to Your Trail Cameras Without Bait
To provide the best experiences, we use technologies like cookies to store and/or access device information. Consenting to these technologies will allow us to process data such as browsing behavior or unique IDs on this site. Not consenting or withdrawing consent, may adversely affect certain features and functions.
Functional
Always active
The technical storage or access is strictly necessary for the legitimate purpose of enabling the use of a specific service explicitly requested by the subscriber or user, or for the sole purpose of carrying out the transmission of a communication over an electronic communications network.
Preferences
The technical storage or access is necessary for the legitimate purpose of storing preferences that are not requested by the subscriber or user.
Statistics
The technical storage or access that is used exclusively for statistical purposes.The technical storage or access that is used exclusively for anonymous statistical purposes. Without a subpoena, voluntary compliance on the part of your Internet Service Provider, or additional records from a third party, information stored or retrieved for this purpose alone cannot usually be used to identify you.
Marketing
The technical storage or access is required to create user profiles to send advertising, or to track the user on a website or across several websites for similar marketing purposes.